Git is a modern version control system, which is used by a staggering number of software projects, both open source and commercial. But Git can also be extremely helpful for social scientists. Before I will explain how Git can be used for your research projects, I will briefly describe what Git is.
Git tracks all the changes you make to files, so you have a record of what has been done, and you can go back to earlier versions should you ever need to. Git is not fooled by the names of the files, but it focuses on the file content itself. After all, files are frequently renamed, split, and rearranged. Git also makes collaboration much easier, allowing changes by multiple people to all be merged into one final output. Whether you are working on a project by yourself, or you are collaborating with others, Git will be helpful.
Version control with Git can take place locally. Your files and all changes are stored on your computer. However, a copy of your files and their revision history can also be stored remote on platforms such as GitHub, BitBucket, or AWS CodeCommit. This allows other people to work on the same project simultaneously. You can upload your changes and download changes made by others, which allows you to collaborate more effectively with others.
One important thing before we start. Git is optimized for text-files, so I don’t recommend using Git for Word documents or other binaries (e.g., Excel, Pdf) at this stage.
How can Git make your research more effective?
To a certain extend your research will not be that different from software development. Your research consists of data and you will probably have different scripts (e.g., R, Python, SPSS), which allow you to analyse your data. Your data and your scripts are most likely subject to change—you might, for example, decide to collect more data or run some additional analyses. You might also have an idea which you would like to explore, but your data shows that it is not eligible to investigate further. Being able to track your changes over time and—if required—go back to an earlier version can be very useful.
Before I started using Git for my research projects, I usually had too many different scripts for analyses that I no longer used but kept just in case I might ever need them again—something that rarely happened. When returning to such projects that have been lying idle for months or years it is often very difficult to reproduce—especially when your files are not named and commented properly—what you did in the past. Git allows you to always have a clean project structure, which only consists of the data you need. When I have an idea I want to explore, I just create a branch (more on this later) where I can always go back to, but I keep the main project clean. When I want to incorporate this idea into the main project, I simply merge this branch with the main project.
Just as in software development, most research projects have multiple researchers working together. Git allows everyone to work on the same research at the same time and all changes are stored remotely, thus making it an extremely effective for collaboration. Whenever you finish a task—no matter how big or small—you upload it to a remote repository, so your collaborators can start working with it straight away. You no longer have to wait for others to complete their work.
How to use Git for your research project?
Rather than mentioning all the concepts of Git at once, I will explain how to use Git through an example so that it is easier to follow.
Install and configure Git
Git is available for multiple operating systems and you can find latest release here. After the installation you can verify the installation by running the following command in your terminal or command prompt:
$ git --version
git version 2.29.2.windows.2
This should output something like this. After verifying that Git is installed correctly you can configure Git and I recommend specifying your name and email address. This allows others working on remote repositories to see which changes were made by whom.
$ git config --global user.name "Jort de Vreeze"
$ git config --global user.email "jortdevreeze@example.com"
Starting with Git
Two of the most common ways to start working with Git are to start a new project locally and optionally upload this to a remote repository (e.g., GitHub), or to download an existing project from a remote repository.
In your computer, create a folder for your research project. Let’s call the project folder example-project. Go into your project folder and start a local repository using the following commands:
$ cd example-project/
$ git init
If you want to start working on an existing project, you can download this from a remote repository into your project folder using the following command:
$ git clone https://url-of-the-remote-repository/project-name.git example-project
$ cd example-project/
Excluding files from version control
If you created an empty repository or if the downloaded repository doesn’t have a .gitignore file, I recommend that you create one. The .gitignore file tells Git which files should not be ignored from version control. This file contains patterns that are matched against file names in your repository to determine whether or not they should be ignored. We want to exclude all non-text files, which I usually place in separate folders (e.g., manuscript, figures). Your .gitignore file should look something like this:
# Ignore all content in the manuscript folder (incl. subfolders)
manuscript/

# Ignore all content in the figures folder (incl. subfolders)
figures/

# Ignore files related to API keys (e.g., username, passwords) if your project uses one
.env

# Ignore hidden system files
.DS_store
Thumbs.db
Let’s start adding content to our repository
You can create new files, copy, or download existing files to your repository. But for demonstrational purposes we create a new file called example.txt and add the following text into it:
This is my first project with GitAfter we created our text file, we want to add it to our repository. Think of Git as keeping a list of changes of files. Each recorded change of a file or set of files is called a commit. Before we make a commit, we must tell Git what files we want to commit, which is called staging. First, we add our file to the staging area and then we commit it to the local repository. If a file is not in the staging area, it will not be committed. The idea behind this is that you can control which files need to be committed. With the following command you can see which files are added to the project and which files have changed since that last commit:
$ git status
On branch main
No commits yet
Untracked files:
  (use "git add ..." to include in what will be committed)
        example.txt
nothing added to commit but untracked files present (use "git add" to track)
We can see that our file example.txt
is added to our folder. We can now add our example.txt
file to the staging area with the following command:
$ git add example.txt
You can also add several files with the following:
$ git add filename1 filename2 filename3Or if you want to add all files in your folder—except those defined in the .gitignore file, you can use:
$ git add .After we added our example.txt to the staging area, we are ready to commit this to the local repository:
$ git commit -m “This is my first commit”
Our first commit we described as “This is my first commit”. For each commit I would advice to be explicit in your description, because this makes it easier to go back to previous commits.
Changing content in the repository
Now that we committed example.txt to our local repository, let’s change the content of example.txt to:
Now I have changed the content in this fileNow we just repeat what we did before:
$ git status
On branch main
Changes not staged for commit:
  (use "git add ..." to update what will be committed)
  (use "git restore ..." to discard changes in working directory)
        modified:   example.txt

no changes added to commit (use "git add" and/or "git commit -a")

$ git add example.txt
$ git commit -m “Updated content of example.txt”
Pro Tip
You can let Git automatically stage files that are already tracked using the following command:
$ git commit -a -m “Updated content of example.txt”This allows you to skip the $ git add part.
The updated text in example.txt is now tracked in Git. If we now run the following command, we can see a list with all the commits that were made so far:
$ git reflog

2e49781 (HEAD -> main) HEAD@{0}: commit: Updated content of example.txt
db683e9 HEAD@{1}: commit (initial): This is my first commit
This output might be a bit daunting, but it contains some important information in case we want to go back to an earlier version (more on this later).
Pushing your work to a remote repository
We are done with our very basic private repository with Git. Now you might want to upload this some remote repository so your collaborators can start working with it straight away. If you are working on a project by yourself there is of course no need to setup a remote repository and you can skip this part. For this tutorial we will be using GitHub. After registering you can create an empty repository and call it my-first-project.
After you created your new repository you get an overview with information to get started with your remote repository.

In order to point your local repository to the remote repository, use the following command with the url displayed above:
$ git remote add origin https://github.com/jortdevreeze/my-first-project.gitNow your local repository and the remote repository are coupled and you can the work that you have done so far to the remote repository:
$ git push -u origin main
Enumerating objects: 6, done.
Counting objects: 100% (6/6), done.
Delta compression using up to 8 threads
Compressing objects: 100% (2/2), done.
Writing objects: 100% (6/6), 520 bytes | 260.00 KiB/s, done.
Total 6 (delta 1), reused 0 (delta 0), pack-reused 0
remote: Resolving deltas: 100% (1/1), done.
To https://github.com/jortdevreeze/my-first-project.git
 * [new branch]      main -> main
Branch 'main' set up to track remote branch 'main' from 'origin'.
You have now pushed example.txt on GitHub . You collaborators can now start working with everything that you have pushed on Github:
$ git clone https://github.com/jortdevreeze/my-first-project.git
$ cd my-first-project/
If you your collaborators pushed their work on the remote repository, you can just pull everything on your local repository again and start working with that:
$ git pull origin main
So now you have successfully setup a remote repository and you can start collaborating.
Creating a new branch
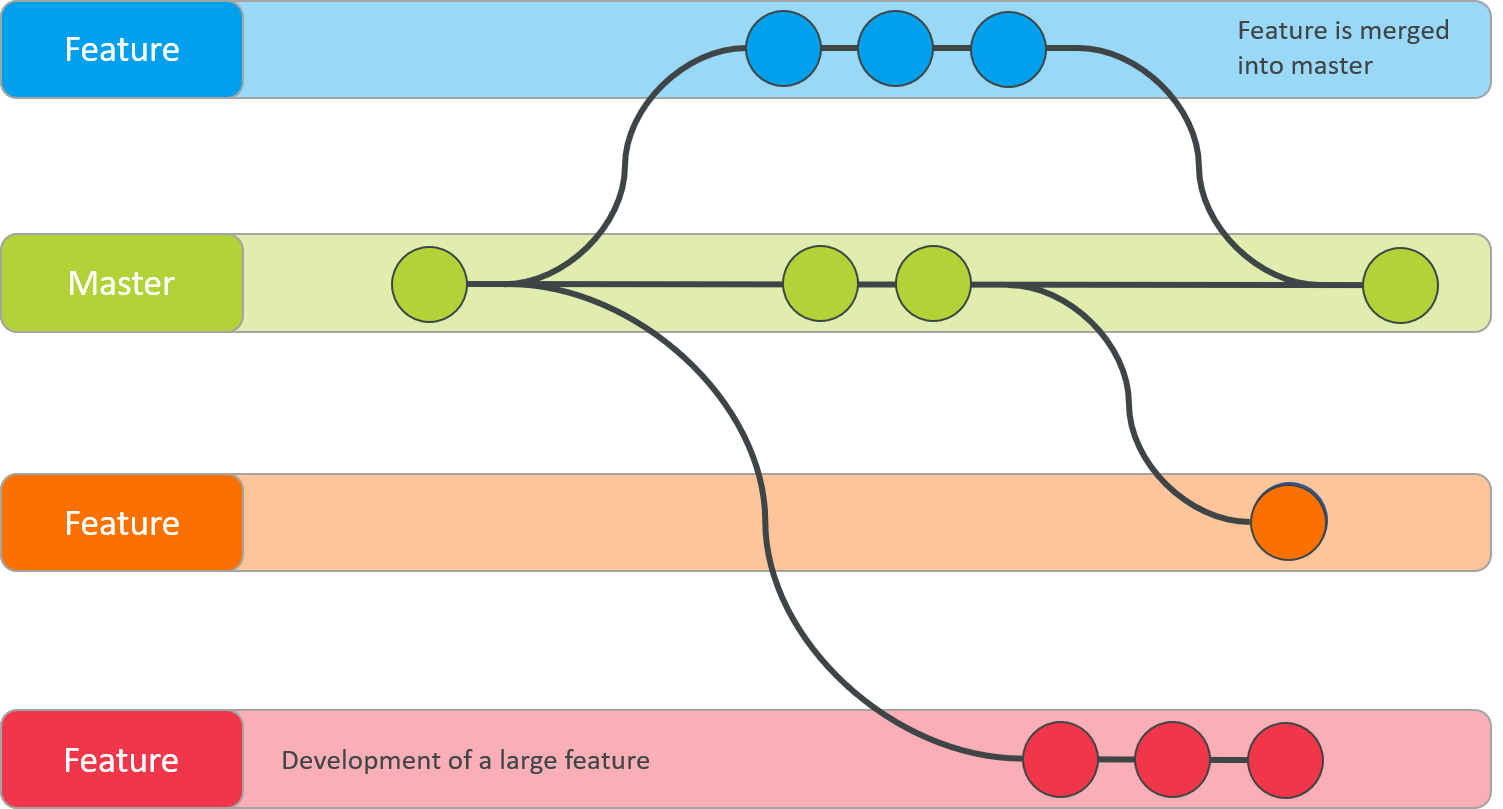
One of the biggest advantages of Git is the use of branches. When a developer wants to start working on something new—regardless how big or small—they can create a branch. Using branching ensures that the main (or master) branch stays clean. When this new feature is finished and tested this branch can be merged into the main branch again.
Suppose you want to do some exploratory data analysis. Rather than doing this on the main branch, it is better practice to create a new branch instead:
$ git branch test
You can view all your branches with:
$ git branch
  test
* main
Note the * in the output, which tells us that we are working in the main branch and that we have to switch to the test branch:
$ git checkout test
Switched to branch 'test'
Pro Tip
You can also create and switch to the new branch with one command:
$ git checkout -b test
Exploratory data analysisWe add and commit this file to the test branch:
$ git add test.txt
$ git commit -m “Added test.txt for exploratory data analysis”
So now we have two files (example.txt and test.txt) in our project folder. Now let's try something interesting and let us go back to the main branch again:
$ git checkout main
Switched to branch 'main'
If we look in our project folder we can see that the file test.txt is no longer there. Only if we are working on some feature—in our case some exploratory data analysis—we have access to the files we need for this work. This allows the main branch to remain clean. If we realize that the exploratory data analysis needs to be implemented, we can merge all the data from this branch with the main branch:
$ git merge test
Updating b7847a5..6ee9344
Fast-forward
 test.txt | Bin 0 -> 66 bytes
 1 file changed, 0 insertions(+), 0 deletions(-)
 create mode 100644 test.txt
Now our file test.txt is available in our project folder again. Because we have merged both branches, we no longer need the test branch and delete it:
$ git branch -d test
Deleted branch test (was 6ee9344).
Going back to earlier versions of the project
This is probably one of the most powerful function from Git, but unfortunately not that straightforward. Let us list all commits that we have done so far:
$ git reflog

6c01ef7 (HEAD -> main) refs/heads/main@{0}: merge test: Fast-forward
6c01ef7 (HEAD -> main) HEAD@{0}: merge test: Fast-forward
2e49781 (origin/main) HEAD@{1}: checkout: moving from test to main
6c01ef7 (HEAD -> main) HEAD@{2}: commit: Added test.txt for exploratory data analysis
2e49781 (origin/main) HEAD@{3}: checkout: moving from main to test
2e49781 (origin/main) refs/remotes/origin/main@{0}: update by push
2e49781 (origin/main) refs/heads/main@{1}: commit: Updated content of example.txt
2e49781 (origin/main) HEAD@{4}: commit: Updated content of example.txt
db683e9 refs/heads/main@{2}: commit (initial): This is my first commit
db683e9 HEAD@{5}: commit (initial): This is my first commit
Again, this output might be a bit daunting, but it displays everything that we did. Suppose that we want to go back to the stage where we updated the content in example.txt. The following line in the output above is where we want to go back to:
2e49781 (origin/main) HEAD@{4}: commit: Updated content of example.txt
Now you can also see why it is important to give explicit descriptions for each commit. There are two different pieces of information that direct us to the point to which we want to return: 2e49781 and HEAD@{4}.
Suppose you want to get rid of everything that you have done since the commit that you want to go back to, you can use a hard reset:
$ git reset --hard 2e49781In case you were working on some new files that were not committed yet, you could use:
$ git stash
$ git reset --hard 2e49781
$ git stash pop
After you the reset you will notice that the test.txt file is no longer there and the you are back at the commit where you wanted to work in again.
If you want to push this to the remote repository you have to force this. When working with others, Git is complicated. When there are other people working on the same branch as well they have to have to resynchronize their work. This might not be something you want, so be aware.
$ git push origin main -fSometimes you want to go back to a commit and try something else. In that case it is practical to start working in a different branch again. So first go back to the commit where we want to go:
$ git checkout 2e49781
And then create a new branch of the given commit:
$ git checkout -b old-state
These are two common options of going back to earlier versions of your work. Unfortunately going back to earlier versions is not that straightforward, especially if you are working with others on the same project.
Conclusion
That's it. I hope that you now have a basic understanding of how to work with Git. I hope it will make your research process more streamlined!