Learn how to extend Odoo modules by creating a Partner Birthday feature with custom models, views, and automated actions while keeping your system clean, upgrade safe and customer focused.
Odoo's modular architecture is built to accommodate a diverse range of business processes. However, there may be instances when the default modules don't align perfectly with specific business requirements. While it might be tempting to directly modify the existing modules, this is considered bad practice, as it can lead to compatibility issues and complicate future updates. Instead, the recommended approach is to extend these modules, adding to or modifying their functionalities without altering the core module itself.
In this blog post, I’ll walk through why extending is the smarter choice, explore common approaches for doing it properly, and share practical examples. By the end, you’ll understand not only how to customize Odoo safely but also how to future-proof your solutions for smoother upgrades and long-term maintainability.
For this tutorial, we’ll extend one of the most widely used models in Odoo: the Partner model. Partners are at the core of Odoo, representing customers, vendors, and contacts, which makes them an excellent example for demonstrating safe and practical customization. By extending this model, you’ll see how to introduce new fields, logic, and automation without touching Odoo’s core code.
Specifically, we’ll build a simple but powerful module called Partner Birthday. Once installed, this module will allow you to track customer birthdays, automatically calculate their ages, and create reminders for salespeople when it’s time to send out birthday wishes. You’ll also be able to quickly filter and find partners with birthdays, making it easier to strengthen customer relationships. This hands-on example will show you exactly how to extend Odoo the right way, giving you a template for future customizations of your own.
You will learn about model inheritance by adding new fields to an existing model. You will create a new model that will be used as a reference for the 'Partner' model. I will also discuss some other model inheritance mechanisms. Finally you will be extending the views for the 'Partner' model, so that the new fields can be used. For this tutorial I assume you already have an instance of Odoo running. Otherwise check out my tutorial about installing Odoo using Docker: Dock, Stack & Launch: Odoo deployment with Docker and Portainer.
Extending Odoo modules
For the application extension we will develop a custom module that will inherit the res.partner model. You can clone the module for this blog post from my GitHub account.
Pro Tip
I suggest to use a prefix that you use for all your modules. For example, your first name, your company name, or some acronym. That way you can always tell which modules are developed by you, or your company. You also make sure that there is no conflict with modules with similar names. For this tutorial, I will use custom as a prefix for the custom module.
The module will use the file structure below:
custom_partner_birthday/
├── data/
│   ├── automated_actions.xml
├── models/
│   ├── __init__.py
│   └── res_partner.py
├── security/
│   ├── ir.model.access.csv
├── static/
│   └── description/
│       └── icon.png
├── views/
│   └── res_partner_views.xml
├── __init__.py
└── __manifest__.py
Note
You can also use the Odoo command line to create an empty module with the scaffold command.
$ odoo scaffold module_name /path/to/store/your/addon
Let's go over each file in our custom module one by one. An Odoo module must contain a __manifest__.py file. For Python to successfully import it, an __init__.py file is also required, which contain the python files we want to import. The icon.png file is optional and this contains the module logo for in the Apps module. The manifest file holds a Python dictionary, detailing the module's attributes, such as dependencies and imports.
{
    'name': 'Partner Birthday',
    'version': '18.0.1.0.0',
    'summary': 'Add date of birth to partners and set up birthday reminders',
    'description': '''
        This module adds a date of birth field to partners and automatically
        creates reminders for the responsible salesperson to congratulate
        the partner on their birthday with their calculated age.
    ''',
    'author': 'Jort de Vreeze',
    'website': 'https://www.example.com',
    'category': 'CRM',
    'depends': ['base', 'mail', 'contacts'],
    'data': [
        'security/ir.model.access.csv',
        'views/res_partner_views.xml',
        'data/automated_actions.xml',
    ],
    'installable': True,
    'application': False,
    'auto_install': False,
}
The manifest declares all the templates and stylesheets that we need to import.
The model
Extending an Odoo model involves adding new fields, methods, and/or overriding existing ones in an already defined Odoo model. For this module we create a model that extends the res.partner model by adding a date of birth feature. In this model I will add a field for storing a date of birth using a Date field and a computed field for storing the age as an Integer. Additionally, I will add a mechanism to remind the salesperson assigned to a contact that the contact has its birthday today.
from datetime import date

from odoo import models, fields, api, _
from odoo.exceptions import ValidationError


class ResPartner(models.Model):
    _inherit = 'res.partner'

    date_of_birth = fields.Date(string='Date of Birth')
    age = fields.Integer(string='Age', compute='_compute_age', store=False)

    @api.depends('date_of_birth')
    def _compute_age(self):
        """Calculate age based on date of birth"""
        today = date.today()
        for partner in self:
            if partner.date_of_birth:
                # Calculate age
                born = partner.date_of_birth
                age = today.year - born.year - ((today.month, today.day) < (born.month, born.day))
                partner.age = age
            else:
                partner.age = None

    @api.constrains('date_of_birth')
    def _check_date_of_birth(self):
        """Ensure date of birth is not in the future"""
        today = date.today()
        for partner in self:
            if partner.date_of_birth and partner.date_of_birth > today:
                raise ValidationError(_("Date of birth cannot be in the future."))

    def check_birthdays_today(self):
        """Check for partners with birthdays today and notify the responsible salesperson"""
        today = date.today()
        domain = [
            ('date_of_birth', '!=', False),
            ('user_id', '!=', False),  # Has a salesperson assigned
            ('type', '=', 'contact'),  # Only contacts, not addresses
        ]
        partners = self.search(domain)

        for partner in partners:
            date_of_birth = partner.date_of_birth
            if date_of_birth.day == today.day and date_of_birth.month == today.month:
                # It's this partner's birthday!
                salesperson = partner.user_id
                age = partner.age

                # Create a note/activity for the salesperson
                partner.activity_schedule(
                    'mail.mail_activity_data_todo',
                    summary=_("Birthday Reminder"),
                    note=_("Today is %s's birthday! They are turning %s years old. Don't forget to congratulate them!")
                         % (partner.name, age),
                    user_id=salesperson.id,
                )
At the beginning of your file, You have to import the necessary components from Odoo. Typically, this includes importing api, fields, and models from Odoo. I also import a translation module _, which is used for translating text, making the model more adaptable for international use. The ValidationError module is imported from the odoo.exceptions so that we can raise an error if the age is not correct. Because we want to calculate the age of a contact, we also need the date functionality of the datetime python module. Next I define a new class that inherits from models.Model. I use the _inherit attribute in the class to specify the name of the existing Odoo model I want to extend. This tells Odoo that my class is extending, not creating a new model. When you want to create a new model you would need _name instead of _inherit.
Note
In this tutorial we are extending an existing module, so access control is already defined in the original module. If you are creating a new model you have to define access rights for each model in the ir.model.access model defined in a security/ir.model.access.csv file. For this tutorial this file does not contain any records, because we are only inheriting existing models.
You define new fields, or update existing one using fields. These fields will be added to the existing model. There are different field types (see the official documentation), but for this module I will use a Date and an Integer field.
Two new fields are introduced:
-
date_of_birth to store the partner’s birthday. -
age that is automatically calculated based on the birthday. This field uses the_compute_age method to determine the age from the current date.
The string attribute contains the label of the field seen by users in the view. The store attribute determines if a value should be stored in the database. For computed fields this value is set by default to False. Because the age is determined by the date of birth of a contact, this value should be computed automatically. The compute attribute contains the name of a method that computes this field. This method will run each time when the date_of_birth field is updated.
To keep data clean, we’ve also added a constraint. The date_of_birth cannot be set in the future. If someone tries to save a partner with a future birthday, Odoo will raise a validation error.
This inherited model uses two separate method decorators for the compute method and for the constraint. If you want to know more about method decorators in Odoo, check out my blog post dedicated to this topic: Understanding and implementing method decorators in Odoo.
The most interesting part is the check_birthdays_today method. This function searches for partners whose birthday matches today’s date. For each one, it checks that a salesperson is assigned, and if so, it automatically schedules an activity for that salesperson. The activity includes a reminder note like: “Today is [Partner’s Name]’s birthday! They are turning [Age] years old. Don’t forget to congratulate them!”
With the model in place, we now have all the logic and data fields needed for our birthday functionality. But models alone aren’t enough. Users won’t benefit from them unless they can actually see and interact with the new fields in Odoo’s interface. That’s where views come in.
In the next step, we’ll extend the partner form view to display the date of birth and age fields, making it easy for salespeople and other users to work with this information directly from the contact record.
The view
Now that we’ve extended the model, the next step is to make those new fields visible and useful inside Odoo’s user interface. We do this by extending the views—i.e., the XML definitions that control how forms, lists, and search filters look and behave.
<?xml version="1.0" encoding="utf-8"?>
<odoo>
    <!-- Add date of birth field to the partner form view -->
    <record id="view_partner_form_inherit_birthday" model="ir.ui.view">
        <field name="name">res.partner.form.inherit.birthday</field>
        <field name="model">res.partner</field>
        <field name="inherit_id" ref="base.view_partner_form"/>
        <field name="arch" type="xml">
            <field name="website" position="after">
                <field name="date_of_birth"/>
                <field name="age" readonly="1"/>
            </field>
        </field>
    </record>

    <!-- Add date of birth filter to the partner search view -->
    <record id="view_res_partner_filter_inherit_birthday" model="ir.ui.view">
        <field name="name">res.partner.filter.inherit.birthday</field>
        <field name="model">res.partner</field>
        <field name="inherit_id" ref="base.view_res_partner_filter"/>
        <field name="arch" type="xml">
            <xpath expr="//filter[@name='inactive']" position="after">
                <filter string="Has Birthday" name="has_birthday" domain="[('date_of_birth', '!=', False)]"/>
            </xpath>
        </field>
    </record>
</odoo>
We inherit the standard partner form base.view_partner_form and insert our new fields right after the existing website field. This way, when a user opens a contact, they’ll see both the Date of Birth field (editable) and the Age field (read-only, because it’s automatically computed).
One important detail in our view definition is the use of the position attribute. This tells Odoo where to insert our new fields within the existing view structure. Since we’re inheriting the base partner form rather than rewriting it completely, we need to specify exactly where the new elements should appear. In this example we place it after an existing field. Here’s how it works:
-
after places the new fields immediately after the website field in the form. -
before would place them right before the website field. -
inside inserts the new content inside a parent element, like inside a group or page. -
replace completely replaces the matched element with your new definition. -
attributes lets you change specific attributes of an existing field (for example, making a field readonly or changing its label).
The second extension enhances the search view base.view_res_partner_filter. Here, we add a new filter option called Has Birthday, which shows only partners that have a date of birth set. This is especially helpful if you want to build a list of customers with birthdays to manage campaigns or check upcoming reminders.

With these small but impactful view changes, your birthday module becomes a feature that’s visible and easy to use. Users can now input birthdays, instantly see ages, and filter contacts who have birthday information available.
At this point, we’ve covered how to extend the models to add the birthday logic and how to adjust the views so users can interact with it in the Odoo interface. But there’s one more piece that brings the whole feature to life: automation. After all, it wouldn’t be very useful if salespeople had to manually check every contact each day to see who has a birthday. That’s where Odoo’s automated actions (cron jobs) come in. With a scheduled action, we can tell Odoo to run our birthday check once a day, automatically creating reminders for the right salesperson.
Automated actions
The final step in making our birthday module useful is automation. Instead of expecting users to manually run the birthday check, we let Odoo handle it in the background using a scheduled action (also known as a cron job).
<?xml version="1.0" encoding="utf-8"?>
<odoo>
    <data noupdate="1">
        <!-- Scheduled action to check for birthdays every day -->
        <record id="ir_cron_check_partner_birthdays" model="ir.cron">
            <field name="name">Check Partner Birthdays</field>
            <field name="model_id" ref="base.model_res_partner"/>
            <field name="state">code</field>
            <field name="code">model.check_birthdays_today()</field>
            <field name="interval_number">1</field>
            <field name="interval_type">days</field>
            <field name="active" eval="True"/>
            <field name="user_id" ref="base.user_root"/>
            <field name="nextcall" eval="(datetime.now().replace(hour=7, minute=0, second=0) + timedelta(days=1)).strftime('%Y-%m-%d %H:%M:%S')"/> <!-- Run at 7 AM daily -->
        </record>
    </data>
</odoo>
In the XML above, we define a record in the ir.cron model, which is Odoo’s way of scheduling recurring tasks. Let’s break it down:
-
name is just the label of the scheduled job, in this case 'Check Partner Birthdays'. -
model_id points to the model the action will run on, hereres.partner. -
state andcode tell Odoo to execute the methodcheck_birthdays_today() on the partner model. This is the method we defined earlier that looks for today’s birthdays and creates reminders for the assigned salesperson. -
interval_number andinterval_type define how often the job should run. Here, it’s set to run once a day. -
active ensures the job is turned on as soon as the module is installed. -
user_id specifies which system user runs the job (in this case, the root user). -
nextcall sets the exact time of day when the job should first run. We’ve scheduled it for 7 AM daily, so salespeople see their reminders at the start of the workday.
With this scheduled action in place, the birthday check happens automatically every morning, ensuring sales teams never miss the chance to congratulate their customers. It’s a great example of how Odoo’s cron jobs can transform custom logic into a real, day-to-day business tool.
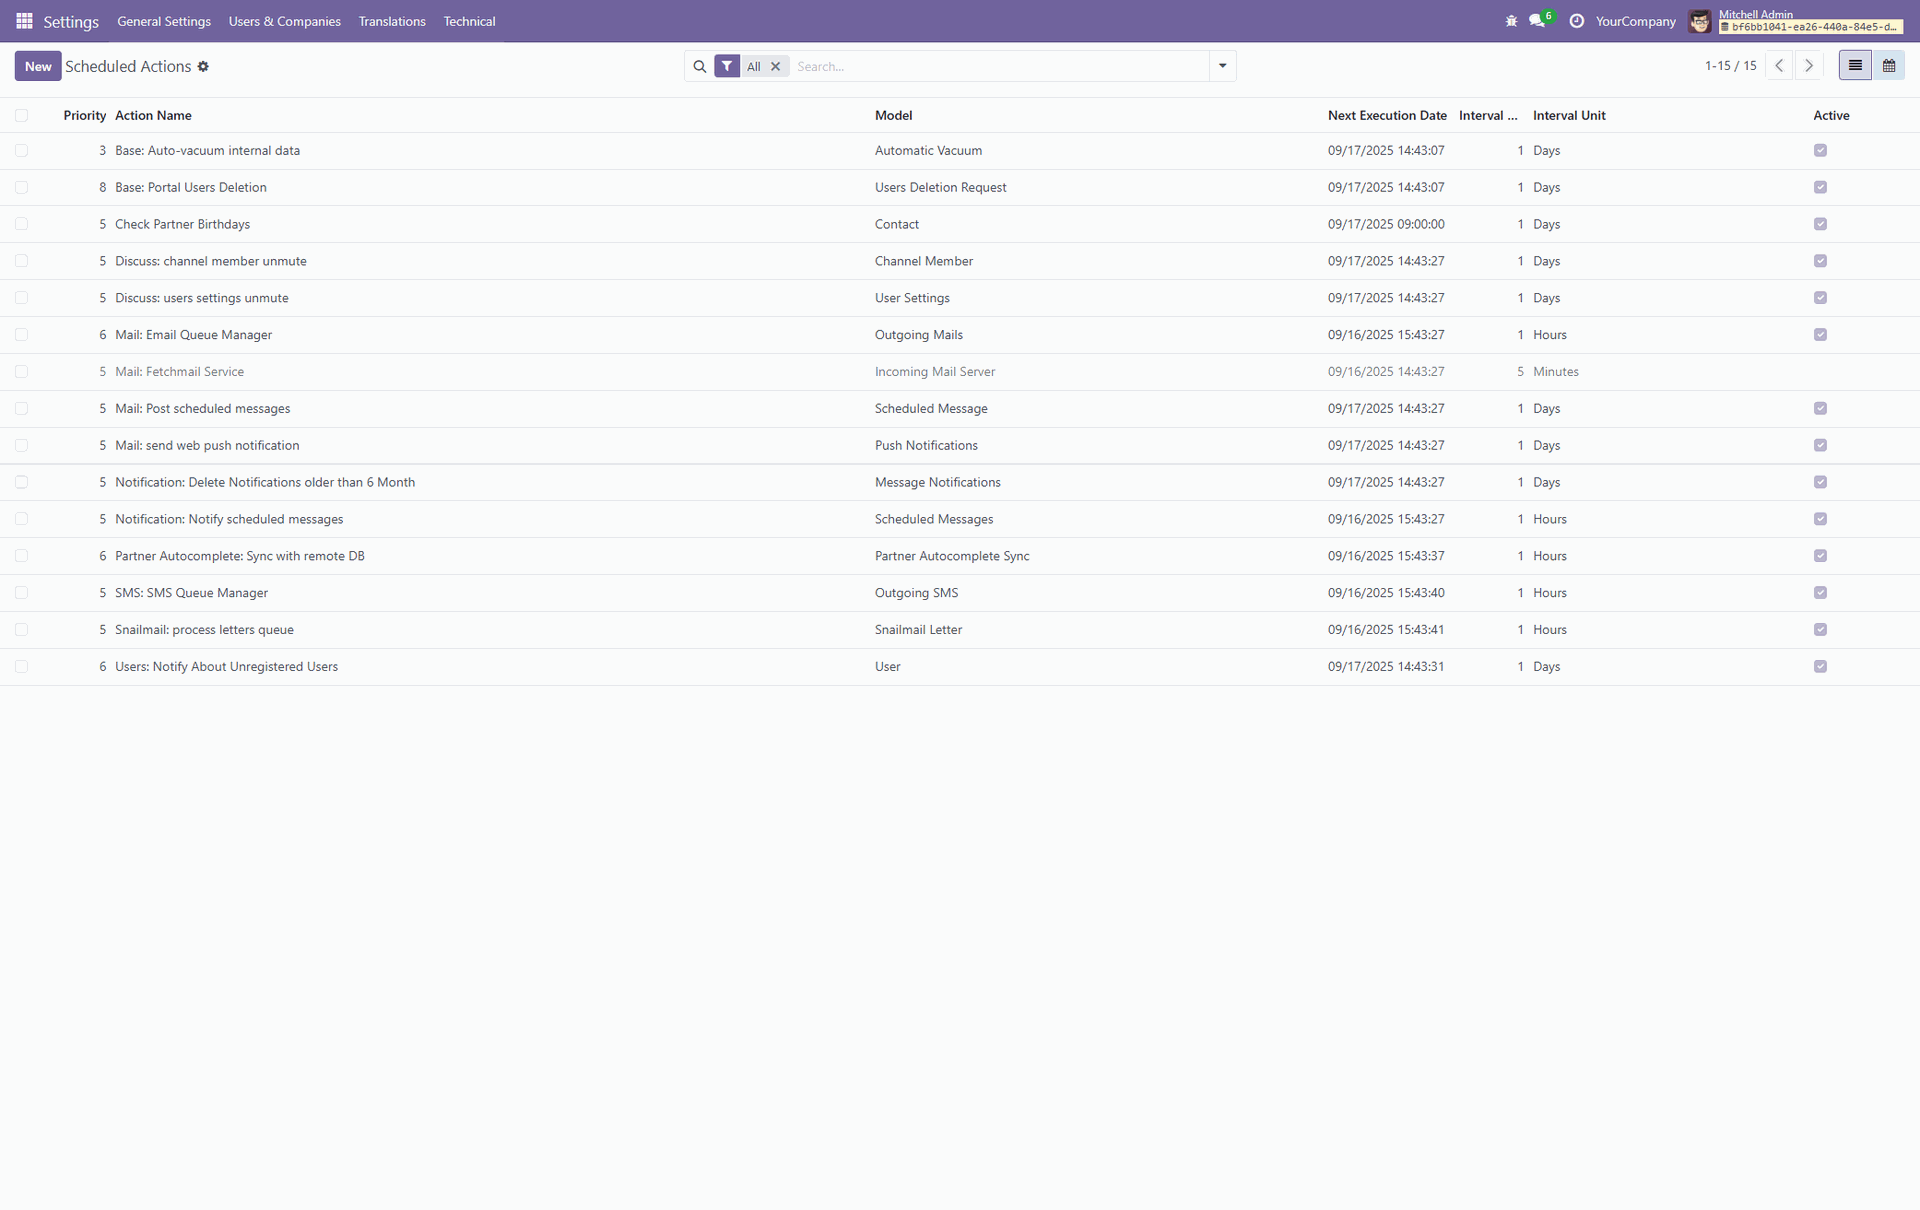
To see how the automated action works, I will execute this manually (developer mode needs to be activated). First you go to 'Settings' -> 'Technical' -> 'Scheduled Actions'.
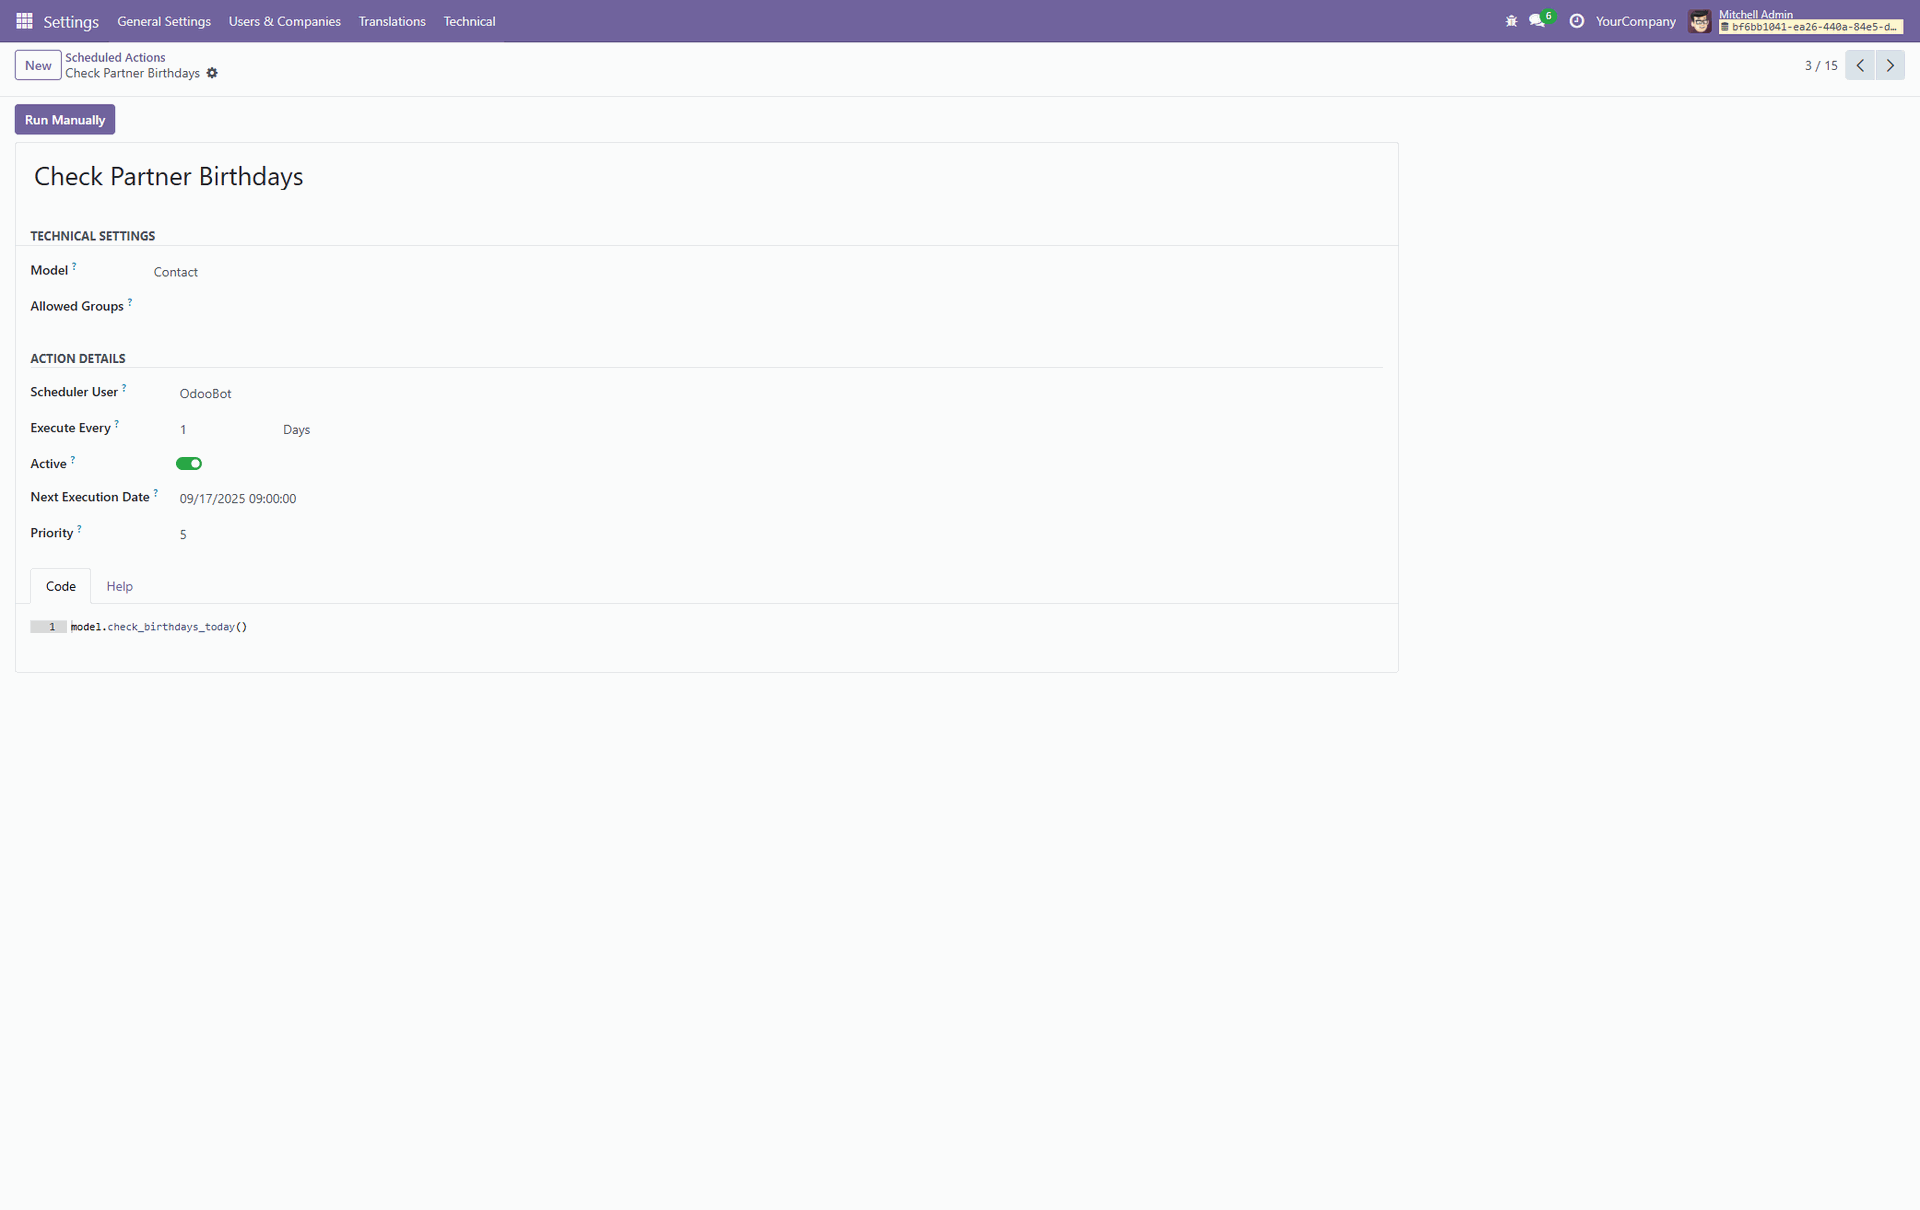
Next you click on our custom created action 'Check Partner Birthdays' and then 'Run Manually'.
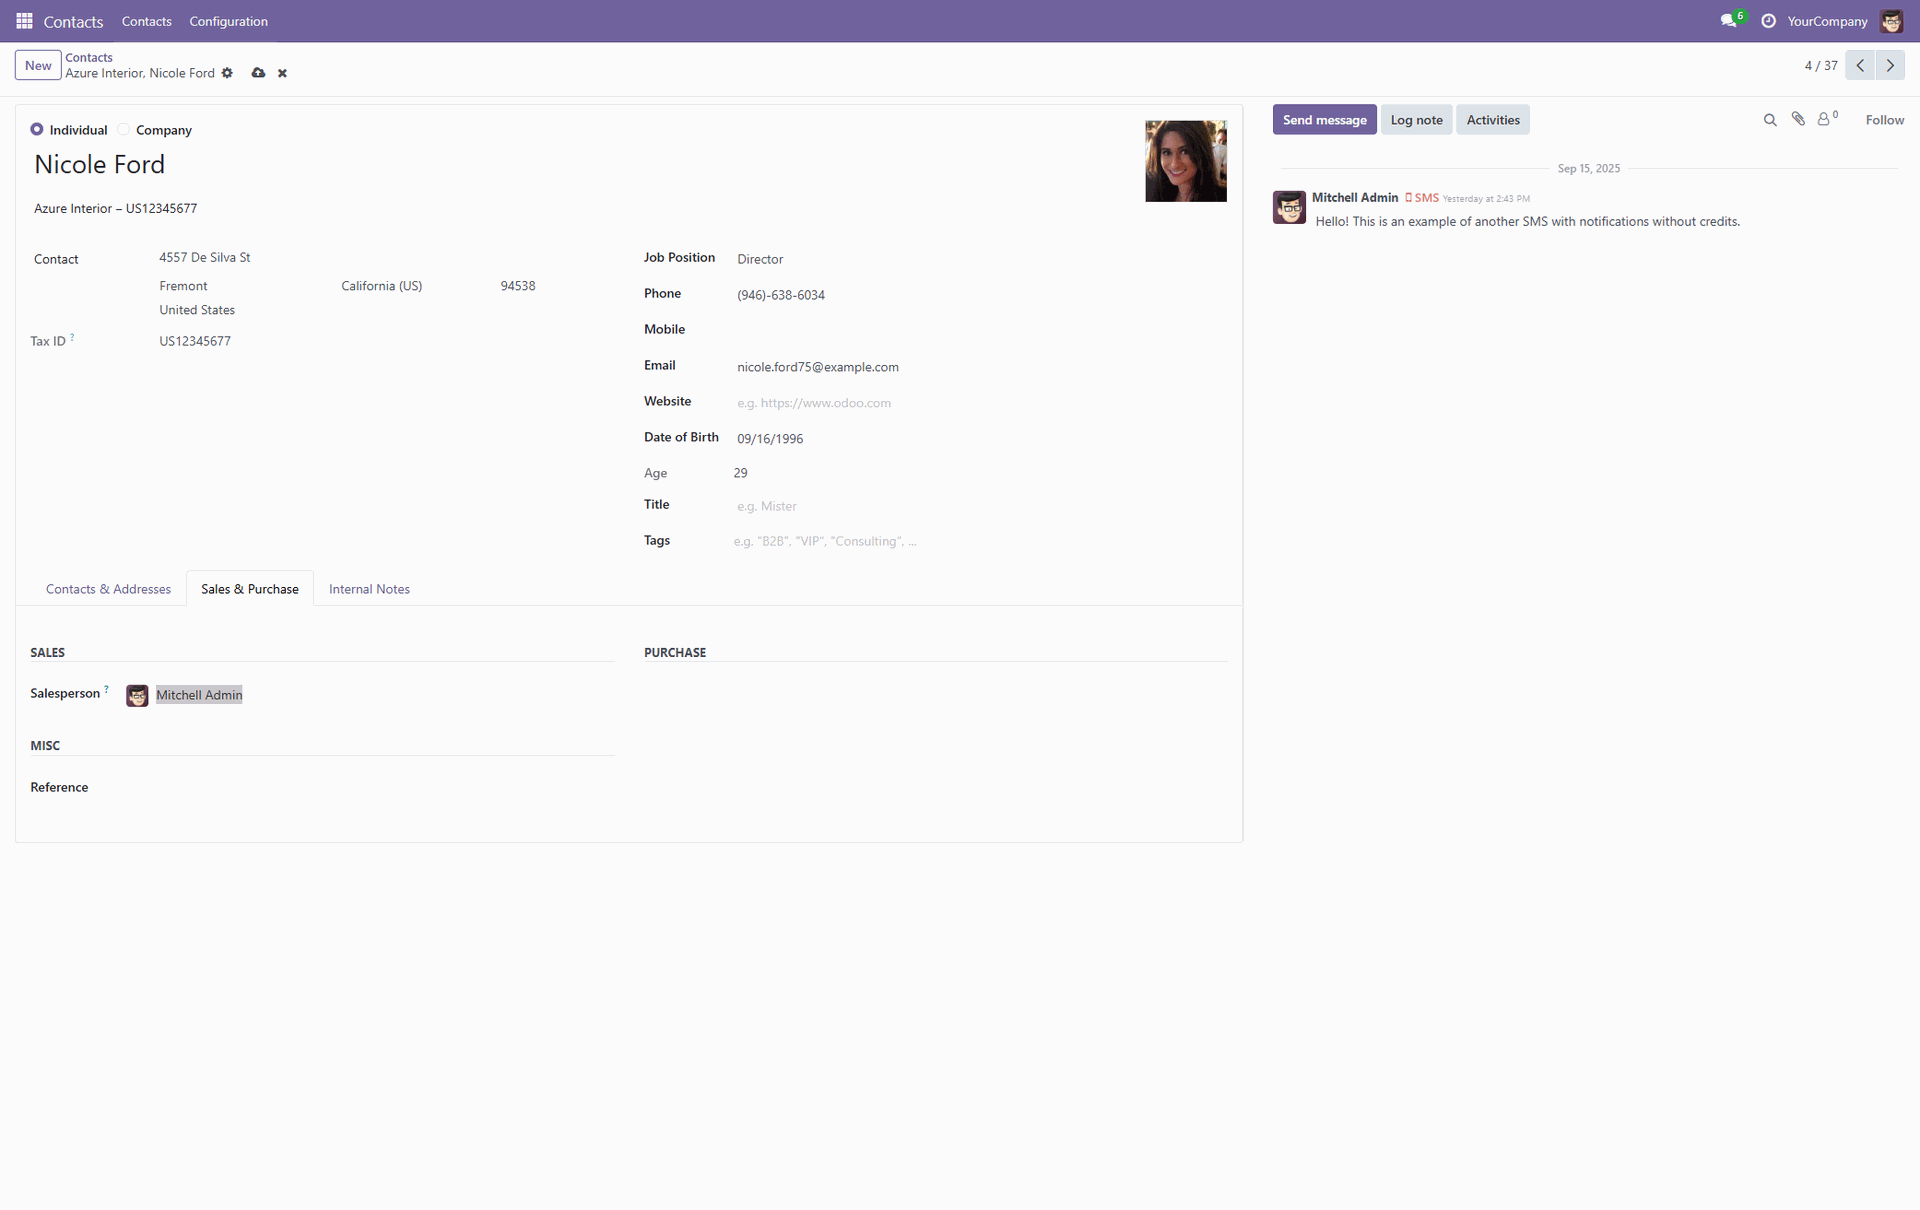
If you go back to the Contact where we added a birth of date earlier (Nicole Ford from Azure Interior) you will see a scheduled action in the chatter.
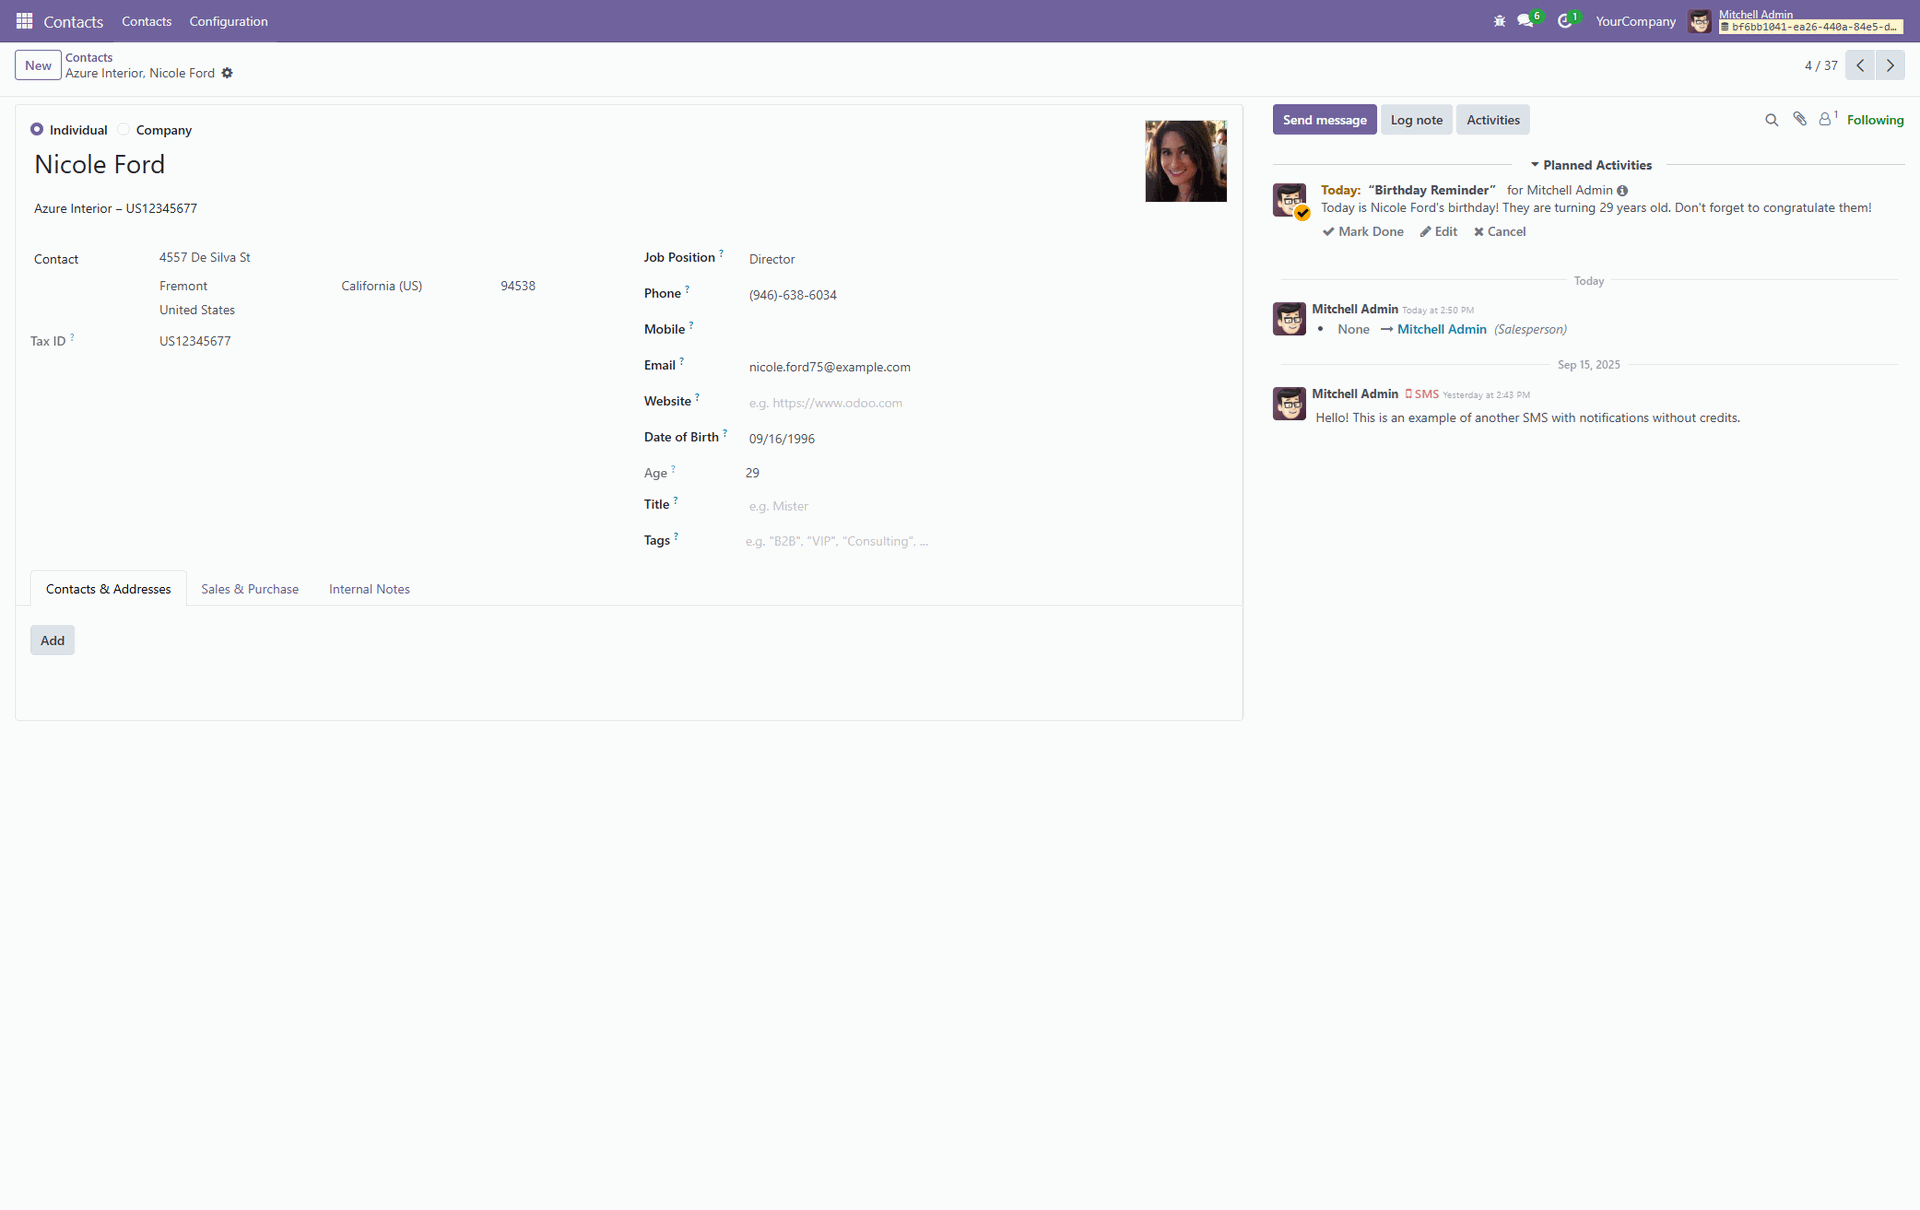
In addition you will also find this scheduled action if you click on the clock icon in the top right corner, which will open all activities for the current user.

Conclusion
That's it! By walking through this tutorial, you’ve seen how to safely extend Odoo’s core models, adapt the views to expose new functionality, and use scheduled actions to automate repetitive tasks. Our Partner Birthday module may be simple, but it demonstrates a powerful principle. With Odoo’s modular design, you can add meaningful, business-specific features without touching the core code. The same approach can be applied to countless other use cases, helping you tailor Odoo to your workflows while keeping your system clean, upgrade-friendly, and ready to grow with your business. You can find the code for this tutorial on my GitHub page.