Transform the look of your Odoo documents. This guide delves deep into creating custom layouts, ensuring each report and document aligns with your brand identity. Odoo offers businesses the liberty to design documents that mirror their brand's requirements. One of its powerful features is the ability to craft custom document layouts. This customization not only adds a personal touch to your business documents, but also introduces a layer of professionalism that standard layouts might not capture. In this guide, we'll delve into the fundamentals of creating these custom document layouts in Odoo 16.
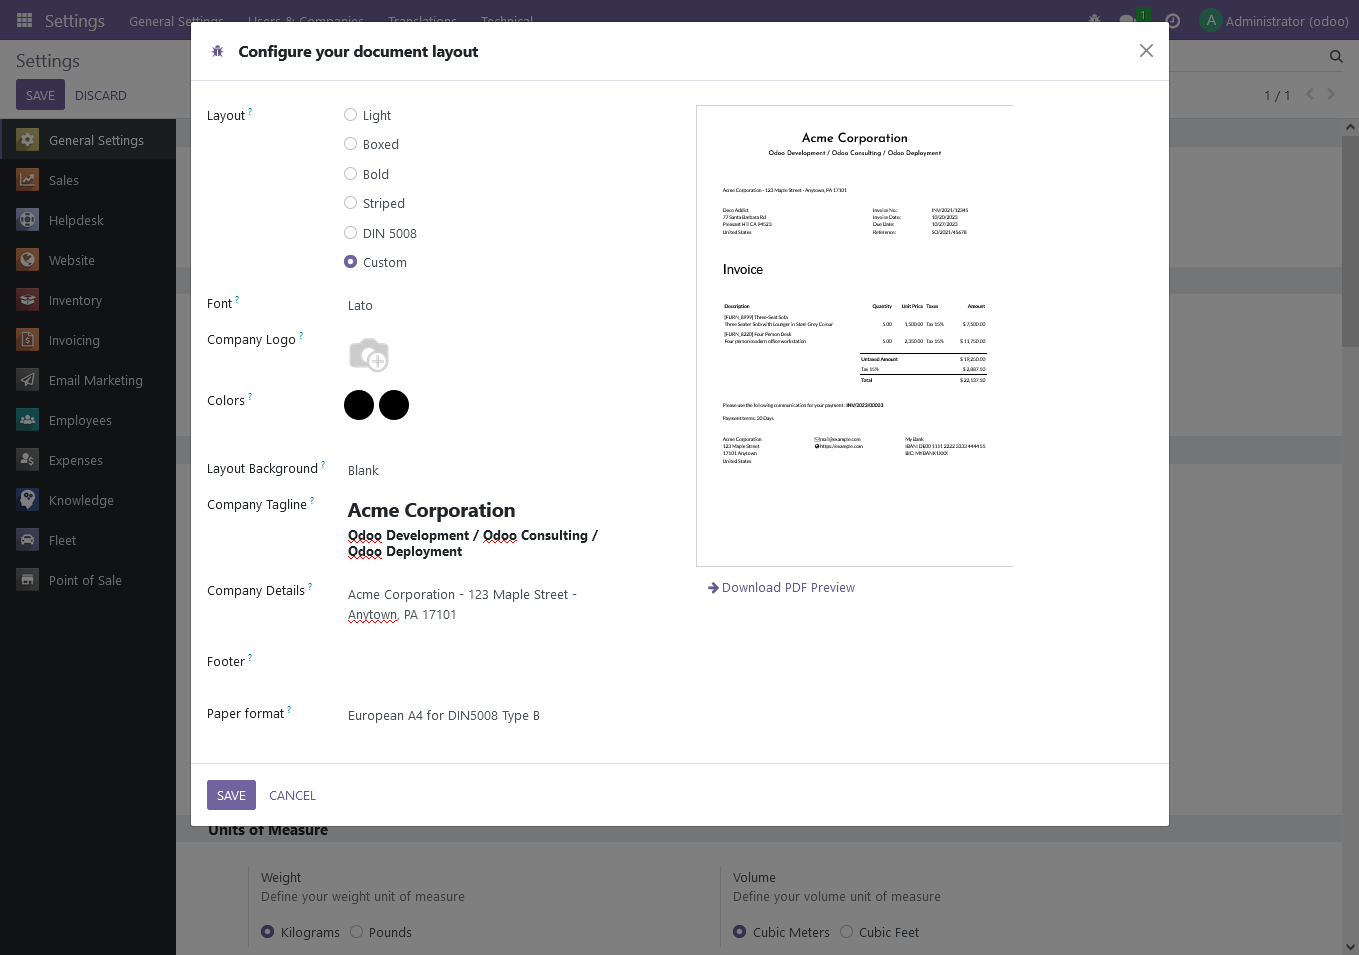
A significant advantage of this customization lies in the 'Configure your document layout' wizard. By creating new layouts, businesses aren't restricted to a one-size-fits-all design. Instead, they can conveniently switch between layouts, choosing the one that fits the specific context or audience. This flexibility ensures that your documents, be it invoices, reports, or purchase orders, always present information in the most effective manner, enhancing both readability and brand consistency. In this comprehensive guide, I will navigate you through all technical parts required for crafting custom document layouts in Odoo. After this guide you will be able to select your own custom template in the Settings.
Custom document layout
For the custom document layout we will develop a custom module. The module will use the file structure below:
base_document/
├── data/
│   └── report_layout.xml
├── static/
│   ├── description/
│   │   └── icon.png
│   └── src/
│       ├── fonts/
│       │   ├── JosefinSans-Bold.ttf
│       │   └── JosefinSans-Medium.ttf
│       └── scss/
│           └── layout_custom.scss
├── views/
│   └── report_templates.xml
├── __init__.py
└── __manifest__.py
An Odoo module must contain a __manifest__.py file. For Python to successfully import it, an __init__.py file is also required, which is in our case empty, because we only have template files. The icon.png file is optional and this contains the module logo for in the Apps module. The manifest file holds a Python dictionary, detailing the module's attributes, such as dependencies and imports.
{
    'name': "Base Document",
    'summary': 'This module adds additional documents for external reports.',
    'author': 'Name',
    'category': 'Base',
    'version': '16.0.1.0.0',
    'depends': ['l10n_din5008'],
    'data': [
        'views/report_templates.xml',
        'data/report_layout.xml',
    ],
    'assets': {
        'web.report_assets_common': [
            'base_document/static/src/**/*',
        ],
    },
    'installable': True,
    'application' : False,
    'license': 'AGPL-3',
}
The manifest declares all the data, templates and stylesheets that we need to import. For this module I included the l10n_din5008 module dependency, because I'm based in Germany, but you don't have to for your documents.
Note
The l10n_din5008 module in Odoo is a localization module tailored for German businesses, adhering to the DIN 5008 standard. This standard specifies rules for formatting letters, documents, and other written communication in Germany. By integrating this module, businesses can ensure that their Odoo-generated documents, ranging from invoices to correspondence, align with the widely-accepted German DIN 5008 formatting guidelines.
Report Template
First we will create the document layout template. We will be focusing on the web.external_layout, which is a template that handles the report header and footer using the corresponding company configuration. In the main template (lines: 6-147) we have access to all fields from a model called base.document.layout from the web module. These fields can be called using a company context (e.g., company.report_header). Because I'm using the l10n_din5008 module, which is an extension of this model, I have access to a couple more fields.
<?xml version="1.0" encoding="utf-8"?>
<odoo>
<data>
<!-- New report layout for din5008 format -->
<template id="external_layout_custom">
<div class="">
<!-- Header -->
<div t-attf-class="header custom_page container o_company_#{company.id}_layout #{'custom_page_pdf' if report_type == 'pdf' else ''}">
<div class="row company_header" t-att-style="'height: %dmm;' % (din_header_spacing or 45)">
<div t-attf-class="#{'col-6' if company.logo != false else 'col-12'} #{'text-left' if company.logo != false else 'text-center'} mt0">
<h3 t-field="company.report_header"/>
</div>
<div t-if="company.logo" class="col-6">
<img
t-if="company.logo"
t-att-src="image_data_uri(company.logo)"
t-att-style="'max-height: %dmm;' % (din_header_spacing or 45)"
class="text-col-right"
alt="Logo"
/>
</div>
</div>
</div>
<!-- Invoice Address and Invoice Details -->
<div
t-attf-class="invoice_note custom_page article container o_company_#{company.id}_layout #{'custom_page_pdf' if report_type == 'pdf' else ''}"
t-att-data-oe-model="o and o._name"
t-att-data-oe-id="o and o.id"
t-att-data-oe-lang="o and o.env.context.get('lang')"
>
<div class="row">
<div class="col" name="company_address">
<div class="company_address">
<span t-if="company.company_details" t-field="company.company_details"></span>
</div>
</div>
</div>
<div class="row">
<!-- Invoice Address -->
<div class="col-5">
<div class="address">
<div t-if="address">
<t t-out="address"/>
</div>
</div>
</div>
<!-- Invoice Details -->
<div class="col-7">
<div class="information_block">
<t t-if="'l10n_din5008_template_data' in company" t-set="template_data" t-value="company.l10n_din5008_template_data"/>
<t t-if="o and 'l10n_din5008_template_data' in o" t-set="template_data" t-value="o.l10n_din5008_template_data"/>
<div class="container">
<t t-foreach="template_data" t-as="row">
<div class="row">
<div class="col-6"><t t-esc="row[0]"/>:</div><div class="col-6"><t t-esc="row[1]"/></div>
</div>
</t>
<t t-if="o and 'partner_id' in o">
<div t-if="o.partner_id.vat" class="row">
<div class="col-6">
<t t-if="o.company_id.account_fiscal_country_id.vat_label" t-esc="o.company_id.account_fiscal_country_id.vat_label"/>
<t t-else="">Tax ID</t>:
</div>
<div class="col-6"><t t-esc="o.partner_id.vat"/></div>
</div>
</t>
</div>
</div>
</div>
</div>
<!-- Document Title -->
<h2>
<span t-if="not o and not docs"><t t-esc="company.l10n_din5008_document_title"/></span>
<span t-else="">
<t t-set="o" t-value="docs[0]" t-if="not o" />
<span t-if="'l10n_din5008_document_title' in o"><t t-esc="o.l10n_din5008_document_title"/></span>
<span t-elif="'name' in o" t-field="o.name"/>
</span>
</h2>
<!-- Document Content -->
<div class="row">
<div class="col">
<t t-out="0"/>
</div>
</div>
</div>
<!-- Footer -->
<div t-attf-class="footer custom_page container o_company_#{company.id}_layout #{'custom_page_pdf' if report_type == 'pdf' else ''}">
<div t-if="report_type == 'pdf'" class="row">
<div class="col text-end page_number">
<div class="text-muted">
Page: <span class="page"/> of <span class="topage"/>
</div>
</div>
</div>
<div class="row">
<div class="col mt-2" style="height: 10px;">
<div style="width: 100%; border-top: solid 1px"></div>
</div>
</div>
<div class="row company_details">
<div class="col-4">
<ul class="list-inline">
<li><span t-field="company.name"/></li>
<li t-if="company.street"><span t-field="company.street"/></li>
<li t-if="company.street2"><span t-field="company.street2"/></li>
<li><span t-if="company.zip" t-field="company.zip"/> <span t-if="company.city" t-field="company.city"/></li>
<li t-if="company.country_id"><span t-field="company.country_id.name"/></li>
</ul>
</div>
<div class="col-4">
<ul class="list-inline">
<li t-if="company.phone"><span class="fa fa-fw fa-phone"/><span t-field="company.phone"/></li>
<li t-if="company.email"><span class="fa fa-fw fa-envelope-o"/><span t-field="company.email"/></li>
<li t-if="company.website"><span class="fa fa-fw fa-globe"/><span t-field="company.website"/></li>
<li t-if="company.vat"><t t-esc="company.account_fiscal_country_id.vat_label or 'Tax ID'"/>: <span t-field="company.vat"/></li>
<li t-if="company.company_registry">HRB Nr: <span t-field="company.company_registry"/></li>
</ul>
</div>
<div class="col-4">
<ul class="list-inline" t-if="company.partner_id.bank_ids">
<t t-foreach="company.partner_id.bank_ids[:2]" t-as="bank">
<li><span t-field="bank.bank_id.name"/></li>
<li>IBAN: <span t-field="bank.acc_number"/></li>
<li>BIC: <span t-field="bank.bank_id.bic"/></li>
</t>
</ul>
</div>
</div>
</div>
</div>
</template>
<template id="layout_custom_css" inherit_id="web.styles_company_report">
<xpath expr="//t[@t-elif]" position="before">
<t t-elif="layout == 'base_document.external_layout_custom'">
&.custom_page {
&.header {
.company_header {
.name_container {
color: <t t-esc='primary'/>;
}
}
}
&.invoice_note {
div {
.address {
> span {
color: <t t-esc='secondary'/>;
}
}
}
h2 {
color: <t t-esc='primary'/>;
}
.page {
[name=invoice_line_table], [name=stock_move_table], .o_main_table {
th {
color: <t t-esc='secondary'/>;
}
}
}
}
}
</t>
</xpath>
</template>
</data>
</odoo>The report consists of a header with letter head, the company details, the customer address, the report details, and the report title. In the template we add an additional class for pdf reports, so we can apply additional formatting. This is done with the <div t-attf-class="#{'custom_page_pdf' if report_type == 'pdf' else ''}"> element. For the letter head we use a fixed height using the height defined in the report.paperformat model, or we fall back to 45mm (~1.77 inch), with the <div t-att-style="'height: %dmm;' % (din_header_spacing or 45)"> element. For the letter head I want the company.report_header to be centered on the page if no company logo is used, otherwise use two columns for both the report header and the company logo. The company details are displayed when they are set in the 'Configure your document layout' wizard, with <span t-if="company.company_details" t-field="company.company_details"/>.
The customer address is added using <t t-out="address"/>. This statement uses the address variable which is set in the respective reports (e.g., report_invoice_document from the account module, or the report_purchaseorder_document from the purchase module). The report details (line: 53-74) are specified in the l10n_din5008_template_data field in the l10n_din5008 module. This field is a binary field that returns the report details for each report (e.g., sale, purchase) and the values are set in the respective l10n_din5008 modules extensions (e.g., l10n_din5008_sale, l10n_din5008_purchase).
l10n_de_template_data = fields.Binary(compute='_compute_l10n_de_template_data')

def _compute_l10n_de_template_data(self):
    self.l10n_de_template_data = [
        (_("Invoice No."), 'INV/2021/12345'),
        (_("Invoice Date"), format_date(self.env, fields.Date.today())),
        (_("Due Date"), format_date(self.env, fields.Date.add(fields.Date.today(), days=7))),
        (_("Reference"), 'SO/2021/45678'),
]l10n_de_document_title field in the
l10n_din5008 module and the report title for each report are set in the respective
l10n_din5008 modules extensions (e.g.,
l10n_din5008_sale,
l10n_din5008_purchase).
Note
If you're not using the l10n_din5008 module for your reports I would use the report details and report title in the default report template and remove the details and title from this template.
The main content is rendered by the respective reports (e.g., sale, purchase) and this is added to the report with the <t t-out="0"/> element. Finally, we have the report footer that adds page numbering for pdf reports and three columns with company details. For all company details a t-if attribute is added that checks if that field is available.
We must also create an additional template (layout_custom_css) ensuring that updates to the primary and secondary colors reflect on our custom report. By inheriting the web.styles_company_report, we incorporate the scss stylesheet. This stylesheet specifies the report elements where the primary and secondary colors, that can be changed in the 'Configure your document layout' wizard, should be applied.
Report Stylesheet
The layout_custom.scss file contains all styling that should be applied to the report template. This file is imported under the assets section of the manifest file.
@font-face {
    font-family: 'Josefin-Sans-Medium';
    src: url('/base_document/static/src/fonts/JosefinSans-Medium.ttf') format('truetype');
    font-weight: 'normal';
}
@font-face {
    font-family: 'Josefin-Sans-Bold';
    src: url('/base_document/static/src/fonts/JosefinSans-Bold.ttf') format('truetype');
    font-weight: 'bold';
}

.custom_page {
    font-size: 9pt;
    .container-fluid & { // center the invoice in portal preview
        margin-left: auto;
        margin-right: auto;
    }
    &.header {
        font-family: 'Josefin-Sans-Medium';
        img, h3 {
            padding: 0;
            margin: 0;
        }
        h3 {
            color: $o-default-report-primary-color;
            padding-top: 3rem;
        }
        img {
            float: right;
        }
    }
    &.invoice_note {
        margin-top: 1rem;
        div {
            .company_address {
                padding-bottom: 1rem;
            }
            .address, .information_block, .shipping_address, .invoice_address {
                margin: 0;
            }
            .address {
                height: 35mm;
            }
            address + div { // hide hardcoded VAT from other layouts
                display: none;
            }
            .address, .shipping_address {
                .company_invoice_line {
                    margin-top: 0;
                }
                > span {
                    color: $o-default-report-secondary-color;
                }
            }
            .information_block {
                line-height: 1.5;
            }
            .information_block, .invoice_address {
                margin-left: 20mm;
            }
        }
        h2, [name=payment_communication], [name=payment_term], [name=comment], [name=note], [name=incoterm] {
            margin-right: 10mm;
            color: $o-default-report-primary-color;
        }
        > .pt-5 {  // hide hardcoded address from base.template.layout
            display: none;
        }
        .page {
            > h2, h1, #informations {
                display: none;
            }
            [name=invoice_line_table], [name=stock_move_table], .o_main_table {
                th {
                    color: $o-default-report-secondary-color;
                }
            }
            tr {
                td {
                    vertical-align: bottom;
                }
            }
        }
    }
}

.classic_page_pdf {
    margin-left: -1rem;
    font-size: 8pt;
}
The stylesheet contains a section where our custom fonts are defined, the main section with the styles we apply to the report template, and a final section that contains the style that should only be applied to pdf reports.
Report Layout
Finally, we need to make sure that our template is added to the report.layout model. The data/report_layout.xml file defines a new or updates an existing layout named "Custom" for reports in Odoo. This is required for the Custom layout to appear in the 'Configure your document layout' wizard.
<?xml version="1.0" encoding="utf-8"?>
<odoo>
    <data>
        <record id="report_layout_custom" model="report.layout">
            <field name="name">Custom</field>
            <field name="sequence">100</field>
            <field name="view_id" ref="base_document.external_layout_custom"/>
            <field name="image">/base_document/static/img/preview_custom.png</field>
            <field name="pdf">/base_document/static/pdf/preview_custom.pdf</field>
        </record>
    </data>
</odoo>
Module Installation
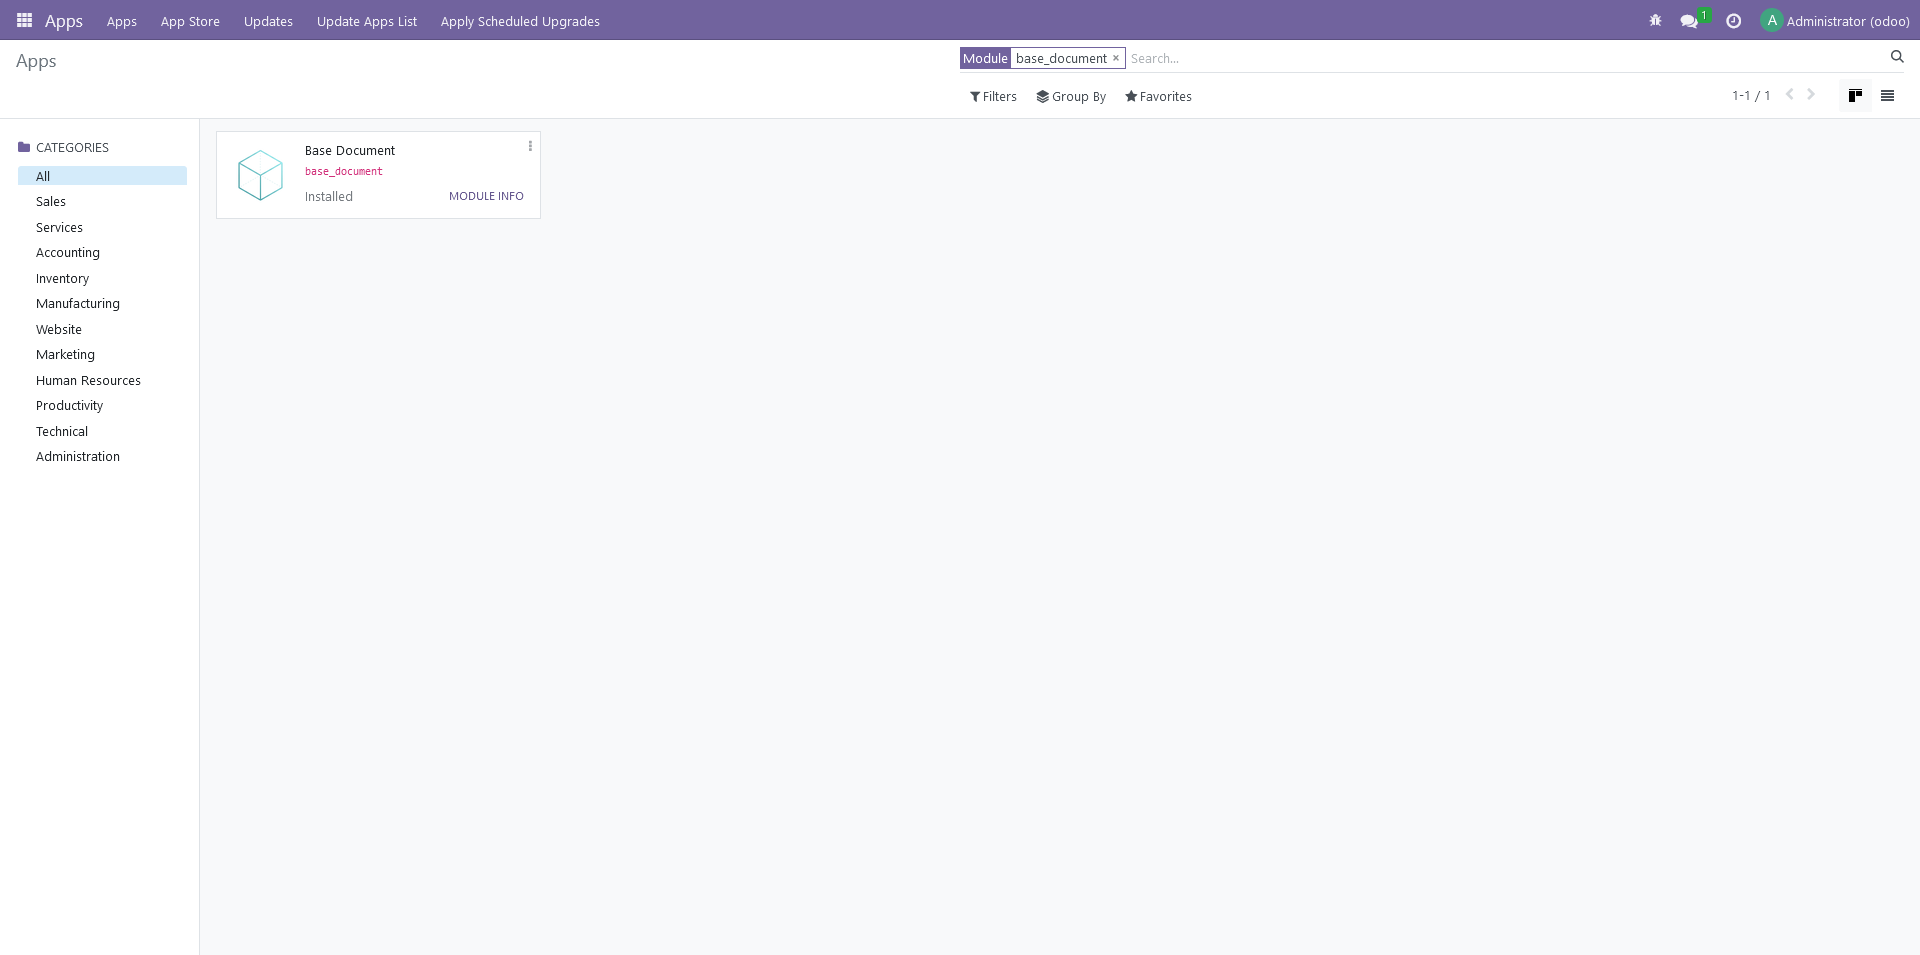
After you add the base_document folder, together with all the content from this tutorial, inside the extra-addons folder for you Odoo instance, you have to restart Odoo. Now activate the 'developer mode' and update the app list in the App module. If you search for base_document you should see the new module in the search results. Click the 'activate' button and you should be able to use your custom report in Odoo.
Report in Action
After successful installation you can activate the custom report in the settings using the 'Configure Document Layout' wizard, as illustrated at the beginning of this post. If you now create a new invoice it will be formatted in the custom document layout.
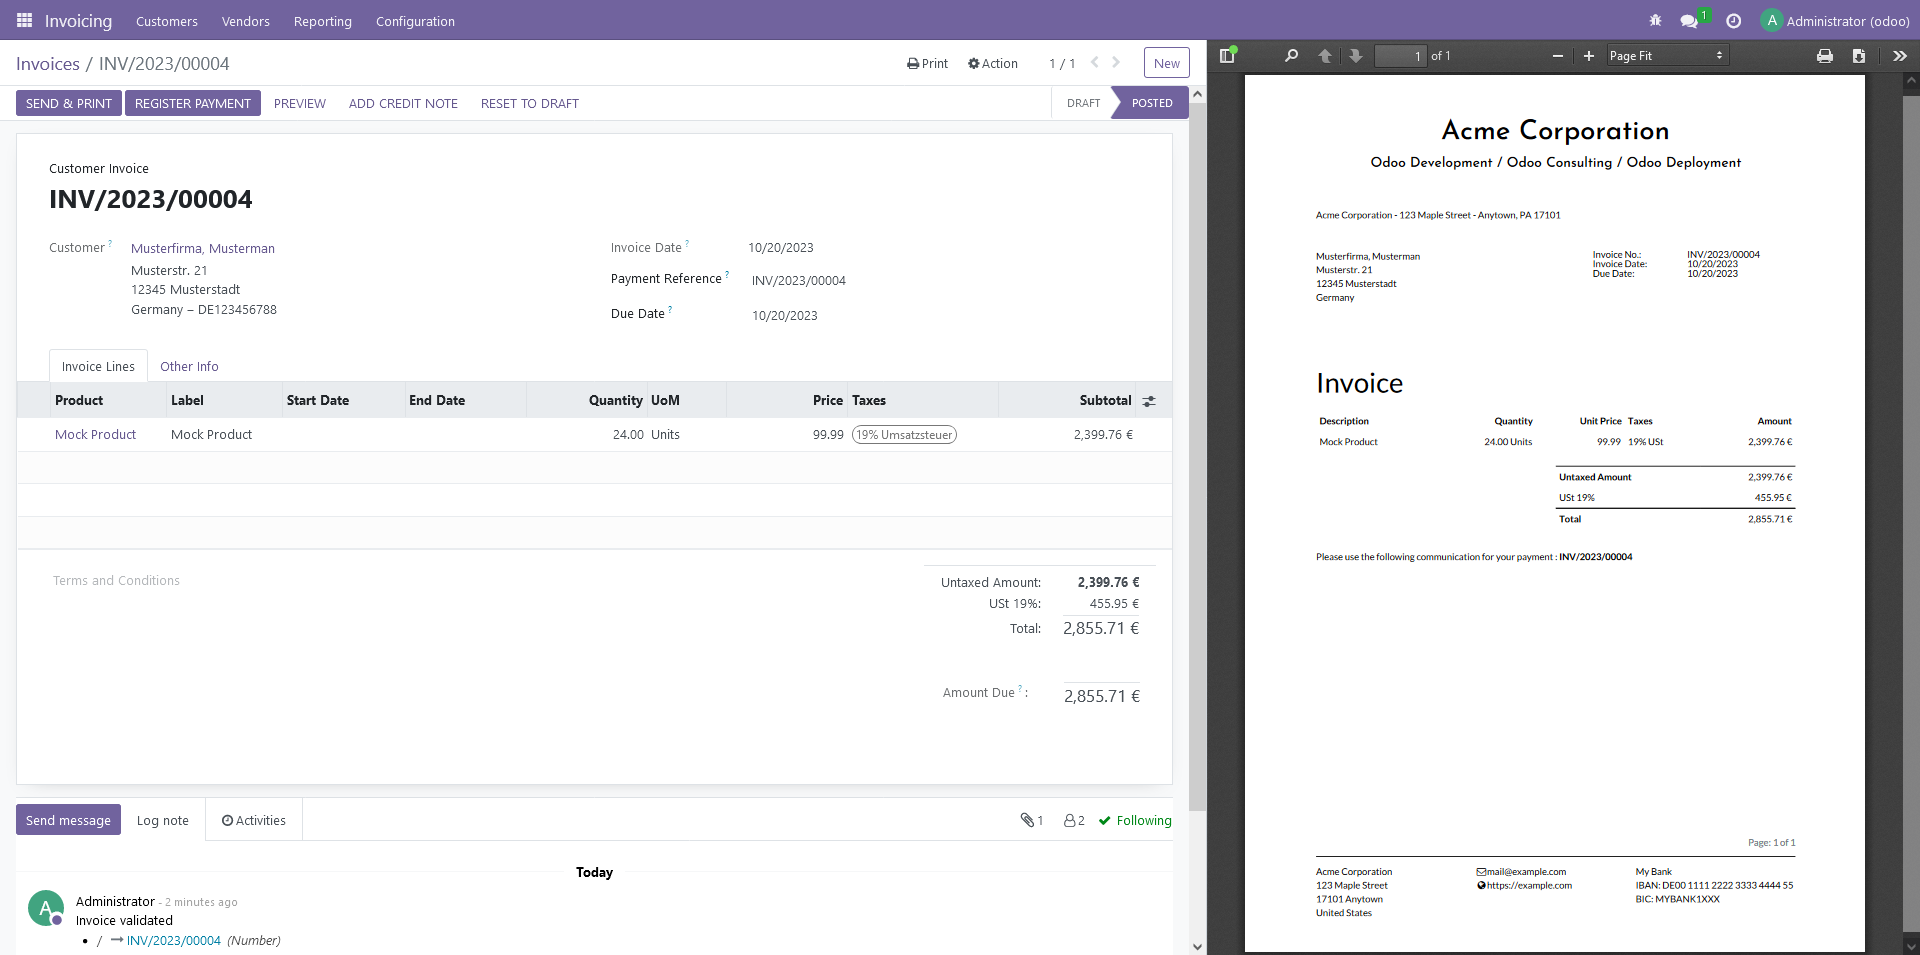
That's it! I hope you found this blog post helpful!