Custom filters in Odoo are a powerful feature, enabling users to sift through extensive databases and pinpoint the exact records they need. By defining parameters that suit specific business needs, users can significantly streamline their workflow, improve productivity, and make data-driven decisions with greater precision. These filters can be applied to various models and fields, allowing for a wide range of sorting and searching criteria, from simple name searches to more complex, conditional queries. Whether it's to single out overdue invoices, filter products based on categories, or create custom views for different user levels, custom filters adapt to a myriad of business scenarios.
Building these custom filters can be approached in two main ways: using Odoo Studio or developing a custom module. Odoo Studio offers a user-friendly, graphical interface, making it accessible for users without extensive technical knowledge to create and manage filters. It allows for on-the-fly adjustments and real-time testing, ideal for businesses looking to implement solutions quickly. On the other hand, creating a custom module requires programming knowledge, typically Python and XML, and offers a deeper level of customization. This approach is suited for unique or complex requirements that go beyond the scope of Odoo Studio's capabilities, allowing developers to tailor every aspect of the filtering logic and user interface. Both methods provide robust solutions to enhance the Odoo experience, catering to a wide spectrum of user needs and technical abilities.
For this tutorial we will create a custom filter for the "Contacts" module, that allows us to quickly find companies that are located in Germany. We will also create a "Group By" record that groups all contacts by city. I will explain how you can do this in Odoo Studio and how you can create a custom module that includes search filters and "Group By" records.
Odoo Studio
If you are using Odoo Enterprise, the easiest way to add a custom filter is using Odoo Studio. Open the "Contacts" module and click on the "Studio" link in the top right of the screen. Here you can modify everything related to the Contacts module (e.g., views, reports, access control).
Now click on "Views" and you can modify all the different Contact views, such as the form view, the list view, but also the search view.

If we click on the "Search" button we can add our custom search filter. Here we want to add a search filter that only shows companies that are located in Germany. Drag the "Filter" component to the "Filter" section. Here we can specify the requirements for our filter. We set the "Country" field to "Germany" and the "Is Company" field to "set".
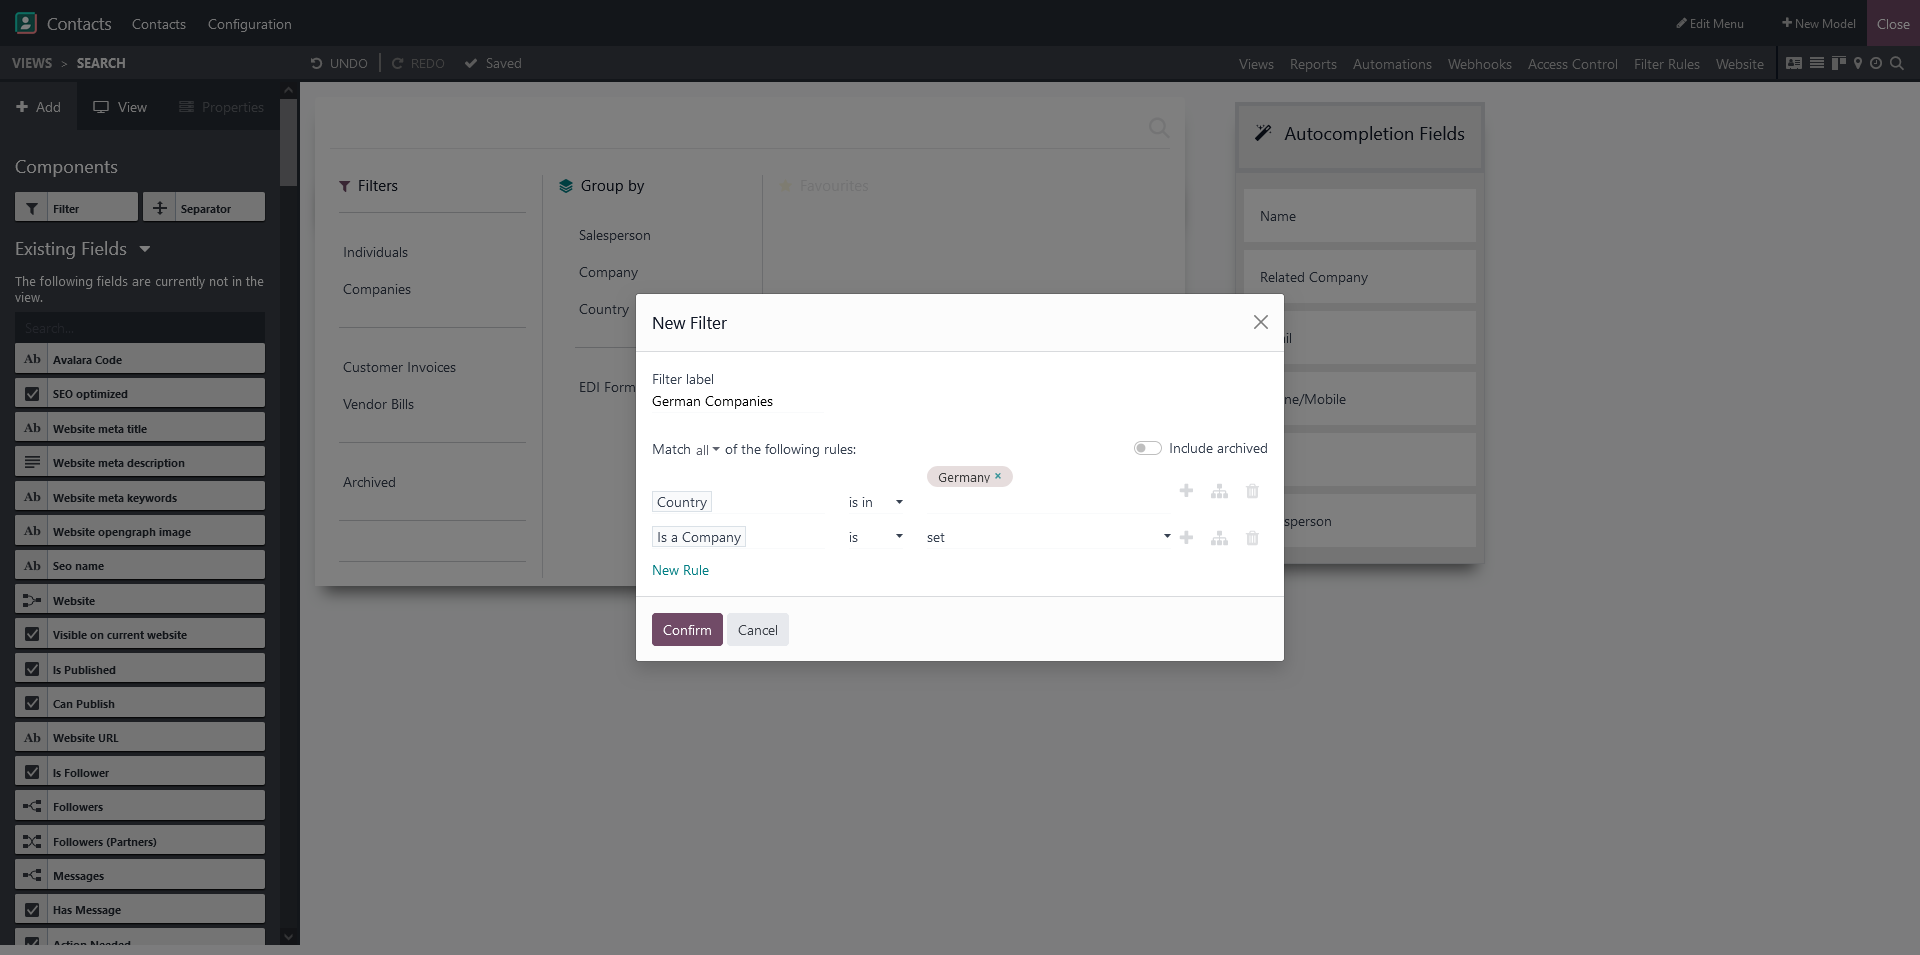
Now click "Confirm" and you see the filter inside the "Filters" list.
You can optionally drag a separator inside the "Filters" list. If you click on "Confirm" you are ready to use your custom filter.
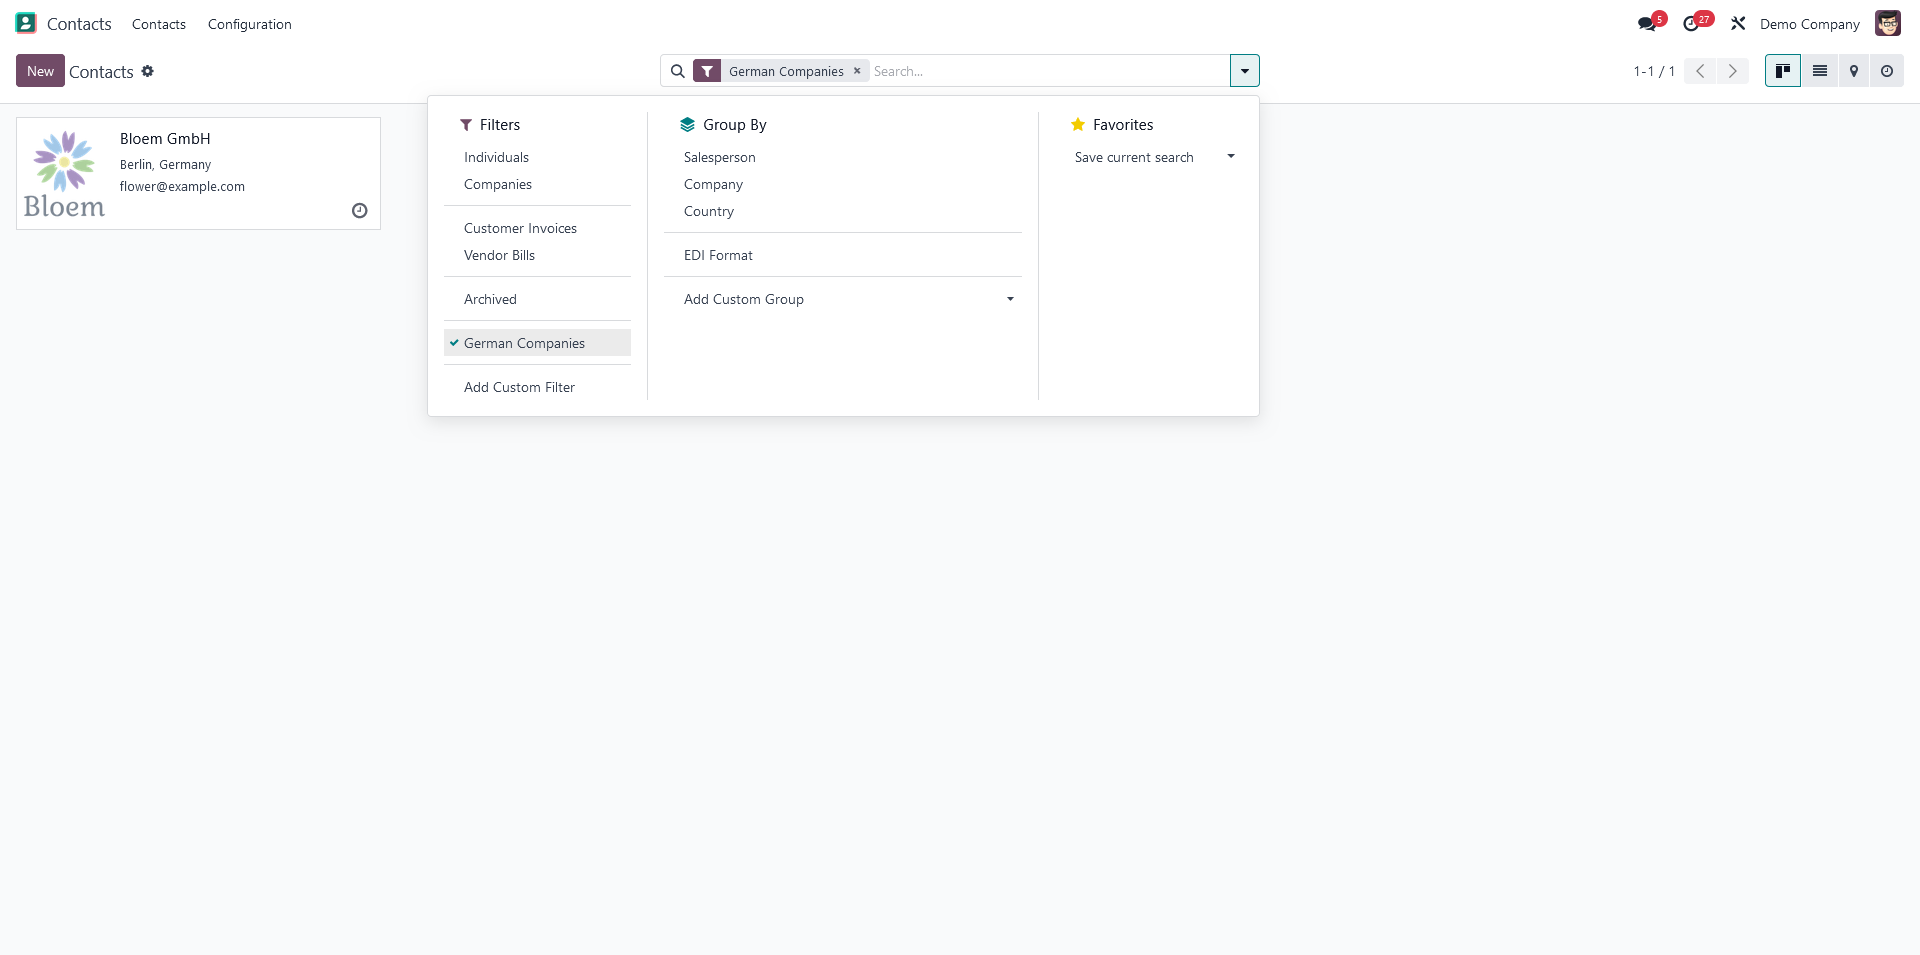
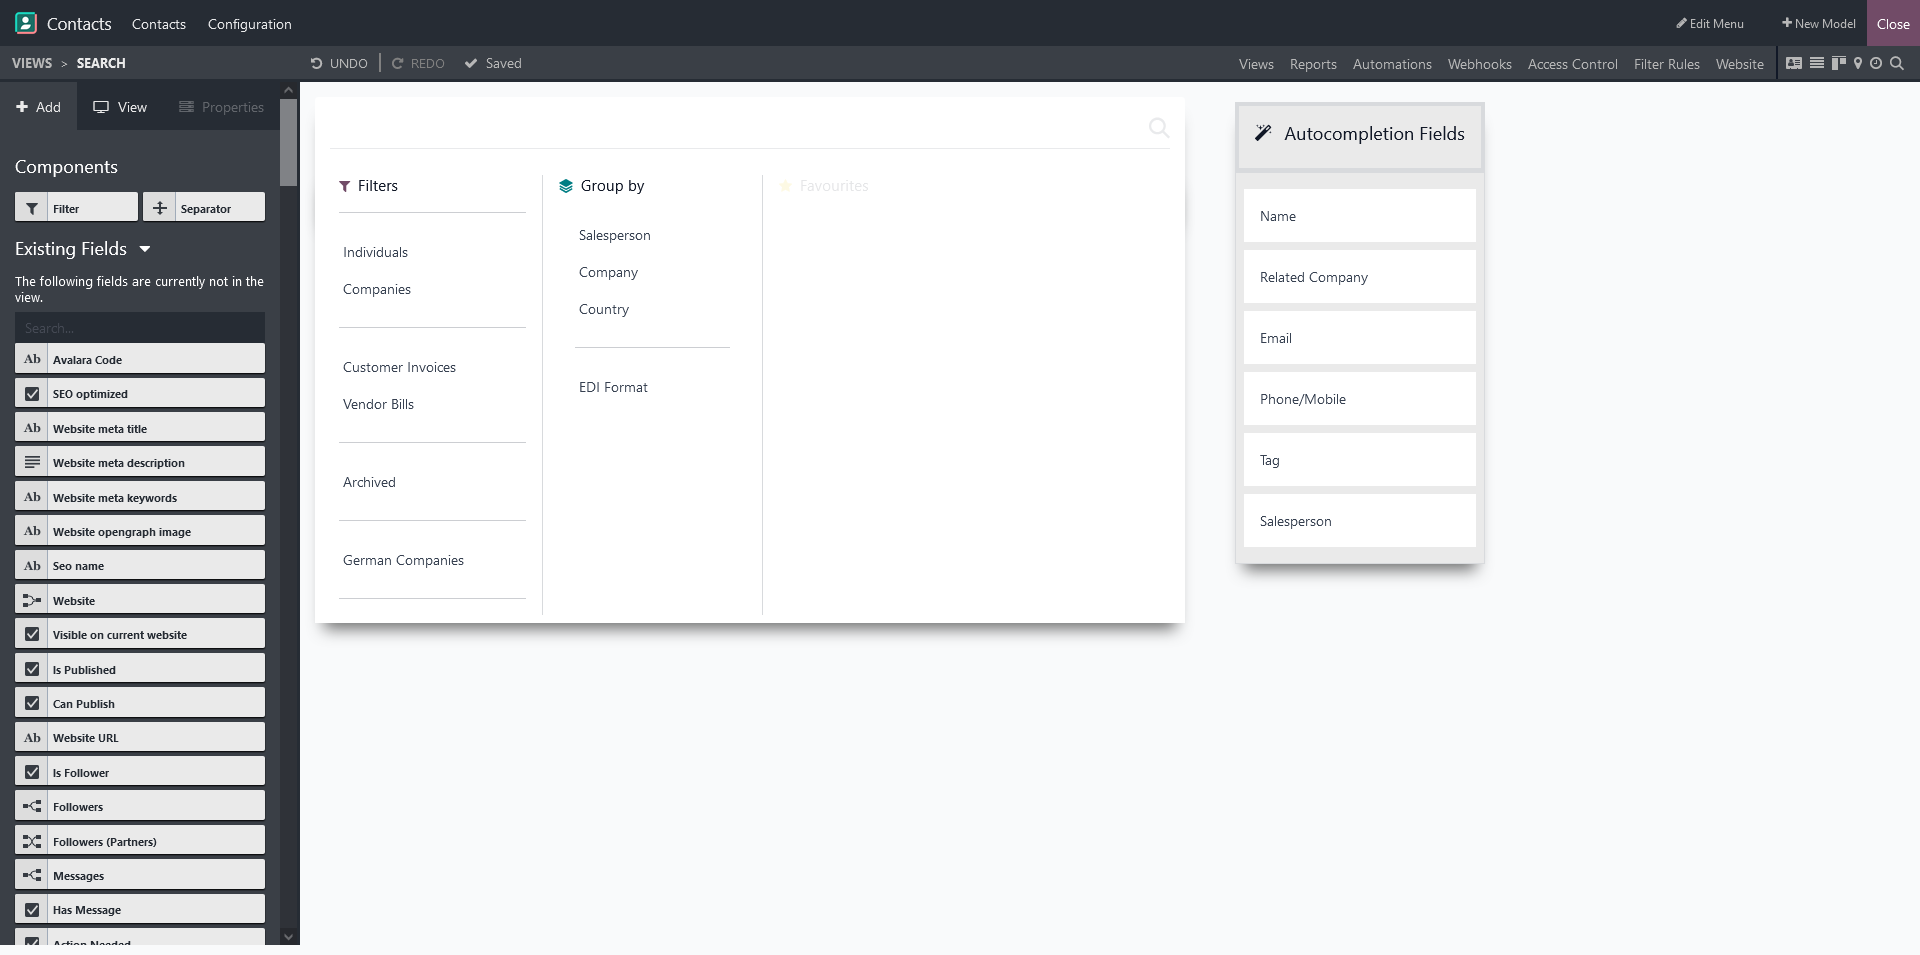
That's it! You have now created your own custom filter. If you want to add a custom "Group By" field, you can repeat the process above and drag-and-drop one of the fields you want (e.g., city) to the "Group By" list. Please note, that this does not work for every field. If you want to use autocomplete for a specific field, you can drag-and-drop one of the fields you want (e.g., city) to the "Autocompletion Fields" list.
Custom Module
If you are not using Odoo Enterprise, or if you don't want to use Odoo Studio to create your own custom filter you can also create one by building a custom module. The module will use the file structure below:
custom_module/
├── views/
│   └── res_partner_views.xml
└── __manifest__.py
An Odoo module must contain a __manifest__.py file. The XML files used to define the search records and custom filters, are placed inside the views directory. The manifest file holds a Python dictionary, detailing the module's attributes, such as dependencies and imports.
{
    'name': "Custom Partner Filters",
    'summary': 'This module adds custom filters to search partners.',
    'author': 'Author Name',
    'category': 'Base',
    'version': '16.0.1.0.0',
    'data': [
        'views/res_partner_views.xml',
    ],
    'installable': True,
    'application' : False,
    'license': 'AGPL-3',
}
The manifest declares the template we want to modify—i.e., where we add our custom filters.
Partner Filter View
First we will create the partner filter template. We will inherit the base.view_res_partner_filter, which is a template record that defines all the search filters for the partner model.
<record id="view_res_partner_filter" model="ir.ui.view">
    <field name="name">res.partner.select</field>
    <field name="model">res.partner</field>
    <field name="arch" type="xml">
        <search string="Search Partner">
            <field name="name"
               filter_domain="['|', '|', '|', '|', ('display_name', 'ilike', self), ('ref', '=', self), ('email', 'ilike', self), ('vat', 'ilike', self), ('company_registry', 'ilike', self)]"/>
            <field name="parent_id" domain="[('is_company', '=', True)]" operator="child_of"/>
            <field name="email" filter_domain="[('email', 'ilike', self)]"/>
            <field name="phone" filter_domain="['|', ('phone', 'ilike', self), ('mobile', 'ilike', self)]"/>
            <field name="category_id" string="Tag" operator="child_of"/>
            <field name="user_id"/>
            <separator/>
            <filter string="Individuals" name="type_person" domain="[('is_company', '=', False)]"/>
            <filter string="Companies" name="type_company" domain="[('is_company', '=', True)]"/>
            <separator/>
            <filter string="Archived" name="inactive" domain="[('active', '=', False)]"/>
            <separator/>
            <group expand="0" name="group_by" string="Group By">
                <filter name="salesperson" string="Salesperson" domain="[]" context="{'group_by' : 'user_id'}" />
                <filter name="group_company" string="Company" context="{'group_by': 'parent_id'}"/>
                <filter name="group_country" string="Country" context="{'group_by': 'country_id'}"/>
            </group>
        </search>
    </field>
</record>
Search fields or filters are specified within the search element. The <field> element within a <search> element in a view template is used to define search fields that users can use to filter or search for records. Here's a detailed explanation of the <field> element and its most important attributes within a <search> element:
- name: This is the most important attribute, specifying the field name from the model that the search view should use.
- string: This attribute provides a custom label for the search field, which is displayed in the user interface.
- filter_domain: This attribute allows defining a custom search domain for the field. It's used for fields that need a specific search implementation. For example,
filter_domain="[('name', 'ilike', self)]", searches the 'name' field of the current model and 'self' refers to the value entered by the user in the search field. So, whatever the user types in the search field is what 'self' will be replaced with during the search.
- operator: Defines the default search operator for the field (like '=', '!=', 'like', 'ilike', etc.). This determines how the search query will be matched with the field's data.
The <filter> element within a <search> element in a view template is used for for defining custom filters. These filters allow users to quickly access pre-defined search queries, enhancing the user interface's efficiency and usability. Below is a comprehensive explanation of the possible attributes of a <filter> element within a <search> element:
- name: A unique identifier for the filter. It's used mainly for internal referencing and inheritance purposes.
- string: The human-readable label for the filter, displayed in the user interface.
- domain: Defines the search domain that the filter applies. It's a Python-like list of tuples specifying the field, operator, and value to filter records. For example,
domain="[('is_company', '=', True)]" lists all contacts that are a company.
- context: This sets the context that will be passed when this filter is activated. It's often used to set default values or to influence the behavior of the action resulting from the filter.
Pro Tip
Filter elements are not only useful for effective searching, but they can also be used by window actions. For example, by adding search_default_filter_name: True to the context of a window action.
A filter can be activated independently, but if you use more filters they will be joined by an OR logic operation. However, you can also use a <separator> element for blocks of filters and filters from different blocks will be joined by an AND logical operation.
You can also apply a group_by filter, records are grouped based on the value of a specified field. For instance, grouping contacts by a salesperson will organize these orders under different salespersons. In a search view, group_by filters are usually defined within a <filter> element using the context attribute. For example, context="{'group_by' : 'user_id'}", to allow grouping by salesperson.
For our custom filters we will inherit the view record from above and add them to the contacts module. Just as in Studio, I will add a filter for companies that are located in Germany. In addition, I will also create a "Group By" record that groups all contacts by city.
<record id="view_res_partner_filter" model="ir.ui.view">
    <field name="name">view.res.partner.filter.inherit</field>
    <field name="model">res.partner</field>
    <field name="inherit_id" ref="base.view_res_partner_filter"/>
    <field name="arch" type="xml">
        <field name="user_id" position="after">
            <field name="city" filter_domain="[('city', 'ilike', self)]"/>
        </field>
        <filter name="inactive" position="after">
            <separator/>
            <filter string="German Companies" name="type_german_company" domain="[('is_company', '=', True), ('country_id', '=', 'Germany')]"/>
        </filter>
        <filter name="group_country" position="after">
            <filter string="City" name="group_city" context="{'group_by': 'city'}"/>
        </filter>
    </field>
</record>
Now everything is in place we can install our custom module. First you have to restart Odoo. Next activate the 'developer mode' and update the app list in the App module. If you search for 'custom_module' you should see the new module in the search results. Click the 'activate' button and you should be able to use your custom filters in the Contacts module.
Conclusion
That's it! I have demonstrated two ways of adding custom filters to Odoo. Although Odoo Studio is more suited for small modifications like this, sometimes you want to add filters to a larger custom module, or you don't have access to Odoo Enterprise. For these circumstances it is helpful to know how to implement custom filters using template records. If you want to now more about custom filters, you can reference the official documentation for all search elements and their respective attributes.