Runboat simplifies Odoo development by turning Git branches into isolated environments, making testing faster, safer, and easier to share with teams or clients. If you’ve ever set up Odoo locally, you know it can get complicated fast — different versions, dependencies, databases, and the constant juggling between projects or branches. Runboat was created to take that pain away.
What is Runboat
Runboat is an open-source tool that makes it easy to spin up temporary Odoo environments for development and testing. Instead of setting up Odoo manually on your machine, Runboat automatically builds and runs Odoo instances from your Git branches using Docker containers.
Here’s how it works in practice:
-
You connect Runboat to your Odoo project repositories.
-
Whenever you push a branch, Runboat builds a container with the right Odoo version and dependencies.
-
It then gives you a dedicated, web-accessible Odoo instance for that branch.
-
Each instance is isolated, so you can test new features or fixes without touching your main setup.
-
When you’re done, you can stop or discard the instance, keeping things lightweight and clean.
Advantages of Runboat
Working with a traditional local setup often means wrestling with dependencies, databases, and version mismatches. You install Odoo manually, configure PostgreSQL, manage Python environments, and patch together different services just to get things running. Switching between Odoo versions can be a real headache, and testing a new branch often clutters your existing database or requires time-consuming manual setup. Over time, your local environment becomes fragile, and small changes risk breaking everything.
Runboat takes that friction away by giving each branch its own clean, isolated Odoo environment. Instead of spending hours fixing configs, you just push your code and instantly get a running instance with the right version and dependencies. This makes experimenting safer, since you’re never touching your main setup, and switching between Odoo 16, 17, or 18 is as easy as changing branches. On top of that, Runboat creates shareable URLs for each instance, so you can show your work to teammates, testers, or clients without asking them to set up their own environment. For developers, it’s the difference between constant maintenance and actually focusing on building features.
What You’ll Learn in This Post
In this blog post, I’ll explain how to set up Runboat for Odoo development. We’ll go through the technical steps of configuring Docker, linking your Git repositories, and preparing your environment so that every branch you push automatically builds into a dedicated Odoo instance. By the end, you’ll have a working Runboat installation that can spin up isolated test environments on demand, with the right version, dependencies, and a fresh database for each branch.
Prerequisites
Before diving into this tutorial, ensure that you have Docker Desktop with Kubernetes installed on your system. This guide works across most operating systems—Windows, macOS, and Linux—but Docker Desktop for Linux does not include kubectl by default. So you have to install it separately by following the Kubernetes installation guide. To verify if Kubernetes is running:
kubectl cluster-infoIf you see your cluster details, you’re good to go. This should look something like this:
Kubernetes control plane is running at https://kubernetes.docker.internal:6443
CoreDNS is running at https://kubernetes.docker.internal:6443/api/v1/namespaces/kube-system/services/kube-dns:dns/proxy

To further debug and diagnose cluster problems, use 'kubectl cluster-info dump'.
Note
You can also install Kubernetes without Docker Desktop. See the installation guide for Windows, macOS or Linux how to install Kubernetes directly.
Using sslip.io for Local Domains
By default, Runboat gives each Odoo instance its own subdomain. To make this work on your local machine, you need a DNS service that can point domains back to your computer. That’s exactly what sslip.io does. When running Runboat locally, you’ll need a way to access your Odoo instances from the browser using proper domain names.
Sslip.io is a free wildcard DNS service that maps any hostname you choose to your local machine’s IP address. For example, if your computer is on 192.168.1.42, you can open an Odoo instance at mybranch.192.168.1.42.sslip.io and it will resolve correctly in the browser without extra DNS setup. This makes it perfect for local Runboat setups, no matter whether you’re on Windows, Linux, or macOS.
Note
GitHub webhooks are difficult to use in a local setup with sslip.io. GitHub needs a publicly reachable HTTPS endpoint to deliver webhook events, but sslip.io points a domain to your local IP, it doesn’t expose your machine securely over the internet. To make webhooks work, you’d need extra tools like ngrok, reverse proxies, or a public server to tunnel traffic back to your machine.
Installing an Ingress controller on Docker Desktop
By default, Docker Desktop’s Kubernetes doesn’t include an Ingress controller. The easiest option is to deploy NGINX Ingress:
kubectl apply -f \
  https://raw.githubusercontent.com/kubernetes/ingress-nginx/main/deploy/static/provider/cloud/deploy.yaml
Once applied, check that the ingress controller pods are running:
kubectl get pods -n ingress-nginx
This will ensure that requests like mybranch.192.168.1.42.sslip.io or mybranch.<your-local-ip>.sslip.io can be routed to the correct Odoo instance.
Create a namespace for Runboat builds
To keep things organized, Runboat will deploy Odoo instances into their own namespace. Create one called runboat-builds:
kubectl create namespace runboat-builds
Adding a Postgres Database for Runboat
Runboat needs a PostgreSQL database for its build jobs. The easiest way to set this up is by running Postgres in its own Docker container.
services:
  postgres:
    container_name: runboat-postgres
    image: postgres:16
    restart: unless-stopped
    environment:
      POSTGRES_USER: runboat
      POSTGRES_PASSWORD: runboat
    ports:
      - "5432:5432"
    volumes:
      - postgres-data:/var/lib/postgresql/data

volumes:
  postgres-data:
    external: true
The Postgres container will use an external volume named "postgres-data" which must be created beforehand.
docker volume create postgres-dataWith the volume in place, we can start our container.
docker-compose up -d This will give you a Postgres instance running on port 5432 with the user runboat and password runboat.
Installation
Runboat can be run locally using Docker Compose. Below is a step-by-step guide to get it working on your machine. First we need to get the source code in order to build the Runboat cluster:
git clone https://github.com/sbidoul/runboat.git
cd runboat
Now configure the docker-compose.yml which we will use to build Runboat.
version: "3.9"

services:

  runboat:
    build: .
    container_name: runboat-controller
    restart: unless-stopped
    ports:
      - "8000:8000"
    volumes:
      - ~/.kube/config:/kubeconfig:ro
      - ./log-config.yaml:/etc/runboat-log-config.yaml:ro
    environment:
      KUBECONFIG: /kubeconfig
      RUNBOAT_BUILD_NAMESPACE: runboat-builds
      RUNBOAT_API_ADMIN_USER: admin
      RUNBOAT_API_ADMIN_PASSWD: secret
      RUNBOAT_MAX_INITIALIZING: "4"
      RUNBOAT_MAX_STARTED: "20"
      RUNBOAT_MAX_DEPLOYED: "200"
      RUNBOAT_BASE_URL: http://localhost:8000
      RUNBOAT_BUILD_DOMAIN: 192.168.1.42.sslip.io
      RUNBOAT_BUILD_ENV: |
        {
          "PGHOST": "host.docker.internal",
          "PGPORT": "5432",
          "PGUSER": "runboat"
        }
      RUNBOAT_BUILD_SECRET_ENV: |
        {
          "PGPASSWORD": "runboat"
        }
      RUNBOAT_BUILD_TEMPLATE_VARS: |
        {
          "storageClassName": "hostpath"
        }
      RUNBOAT_REPOS: |
        [
          {
            "repo": "^yourorg/(repo_one|repo_two)$",
            "branch": "^16\\.0(-.+)?$",
            "builds": [ { "image": "ghcr.io/oca/oca-ci/py3.10-odoo16.0:latest" } ]
          },
          {
            "repo": "^yourorg/(repo_one|repo_two)$",
            "branch": "^17\\.0(-.+)?$",
            "builds": [ { "image": "ghcr.io/oca/oca-ci/py3.10-odoo17.0:latest" } ]
          },
          {
            "repo": "^yourorg/project_one$",
            "branch": "^18\\.0(-.+)?$",
            "builds": [ { "image": "ghcr.io/oca/oca-ci/py3.10-odoo18.0:latest" } ]
          }
        ]
      RUNBOAT_GITHUB_TOKEN: ""
The docker-compose.yml is where Runboat’s controller gets its instructions, and a few parts of it are especially important to understand. The controller itself is built directly from the repository’s Dockerfile and exposes its API and documentation at http://localhost:8000/docs. To connect with Docker Desktop’s Kubernetes, the configuration mounts your local kubeconfig and points Runboat to a dedicated namespace called runboat-builds. This is where every Odoo environment will be created, so make sure to create the namespace before starting Runboat. The file also defines admin credentials and limits to control how many environments can be initialized or deployed at the same time.
Equally important are the settings that define how your builds become accessible. The RUNBOAT_BASE_URL tells Runboat where its controller lives, while RUNBOAT_BUILD_DOMAIN defines the wildcard domain used for branch-based URLs. By using sslip.io every build will be reachable at its own subdomain. Make sure you replace
replace the IP with your own.
Since Odoo needs a database for each environment, the configuration also includes connection details for PostgreSQL. On Docker Desktop, host.docker.internal usually works, though you can use your LAN IP if needed. Runboat uses this connection to spin up fresh databases for each branch automatically. The RUNBOAT_BUILD_TEMPLATE_VARS section points Runboat to your cluster’s storage class (check it with kubectl get storageclass)
Note
On Linux, host.docker.internal may not work by default. In that case, replace it with your host machine’s IP address (e.g., 192.168.1.42) or the Docker bridge gateway (usually 172.17.0.1). You can find your local IP using ip addr show.
Finally, RUNBOAT_GITHUB_TOKEN is is required to in order to work with Runboat. More about this later. The RUNBOAT_REPOS section is where you define which repositories and branches Runboat should watch, and which Docker image each branch should use when creating an Odoo environment. Think of it as the routing table between your code and the Odoo version it runs on.
In the example above, we’ve added three rules. The first two cover the repositories yourorg/repo_one and yourorg/repo_two. If someone pushes to branch 16.0 (or 16.0-something), Runboat will build an Odoo 16 environment using the ghcr.io/oca/oca-ci/py3.10-odoo16.0:latest image. If the branch is 17.0 (or 17.0-fix, 17.0-featureX), then Runboat uses the Odoo 17 image instead (ghcr.io/oca/oca-ci/py3.10-odoo17.0:latest).
The third rule is for a different repository, yourorg/project_one. Here, only the 18.0 (or 18.0-something) branches are considered, and Runboat spins up environments based on the Odoo 18 image (ghcr.io/oca/oca-ci/py3.10-odoo18.0:latest).
Note
In the examples so far, we’ve used OCA CI images like https://ghcr.io/oca/oca-ci/py3.10-odoo17.0:latest. These are community-maintained base images that already contain Odoo (Community Edition), Python dependencies, wkhtmltopdf, and other tooling commonly needed for Odoo development. They’re great for quickly spinning up environments because you don’t have to worry about missing system packages or mismatched Python versions.
However, you’re not limited to these images. You can also build your own Docker images tailored to your projects. For example, if your company uses Odoo Enterprise, you can create an image based on the official Odoo Enterprise code, add your custom addons, and push it to your registry (GitHub Container Registry, Docker Hub, or a private one). As long as it’s a valid image, you can reference it in RUNBOAT_REPOS and Runboat will use it to start new environments.
Notice the regular expressions like ^16\\.0(-.+)?$. This tells Runboat to match both the plain branch 16.0 and any variations that start with 16.0-, which is handy if your team names branches 16.0-bugfix or 16.0-new-feature.
Example Configuration
For this example I will use a repository created for another blog post. This repository contains a module extension which we will deploy using Runboat.
RUNBOAT_REPOS: |
	[
	  {
		"repo": "^jortdevreeze/extending-modules$",
		"branch": ".*",
		"builds": [{"image": "ghcr.io/oca/oca-ci/py3.10-odoo18.0:latest"}]
	  }
	]
The regular expression .* will match any branch name and automatically spins up environments based on the Odoo 18 image.
You also have to create a GitHub token that can read and write commits. In GitHub go to 'Settings' -> 'Developer settings' -> 'Personal access tokens'. Click 'Generate new token (classic)' and give it a descriptive name like 'Runboat Integration'. For Runboat to work properly, select at least these permission: repo:status. Now you can use this token in the docker-compose file.
Starting Runboat
With our configuration in place we can finally start Runboat with docker-compose up --build -d. This could take a while because it needs to pull all the necessary images.
#1 [internal] load local bake definitions
#1 reading from stdin 584B done
#1 DONE 0.0s

#2 [internal] load build definition from Dockerfile
#2 transferring dockerfile: 1.57kB done
#2 DONE 0.0s

#3 [internal] load metadata for https://docker.io/library/python:3.13
#3 DONE 0.8s

#4 [internal] load .dockerignore
#4 transferring context: 2B done
#4 DONE 0.0s

#5 [internal] load build context
#5 transferring context: 1.91kB done
#5 DONE 0.1s

#6 [1/7] FROM https://docker.io/library/python:3.13@sha256:c1dab8c06c4fe756fd4316f33a2ba4497be09fa106d2cd9782c33ee411193f9c
#6 resolve https://docker.io/library/python:3.13@sha256:c1dab8c06c4fe756fd4316f33a2ba4497be09fa106d2cd9782c33ee411193f9c
#6 resolve https://docker.io/library/python:3.13@sha256:c1dab8c06c4fe756fd4316f33a2ba4497be09fa106d2cd9782c33ee411193f9c 0.1s done
#6 DONE 0.1s

#7 [2/7] ADD https://dl.k8s.io/release/stable.txt /tmp/kubectl-version.txt
#7 DONE 0.4s

#8 [6/7] COPY log-config.yaml /etc/runboat-log-config.yaml
#8 CACHED

#9 [2/7] ADD https://dl.k8s.io/release/stable.txt /tmp/kubectl-version.txt
#9 CACHED

#10 [3/7] RUN curl -L   "https://dl.k8s.io/release/$(cat /tmp/kubectl-version.txt)/bin/linux/amd64/kubectl"   -o /usr/local/bin/kubectl   && chmod +x /usr/local/bin/kubectl
#10 CACHED

#11 [4/7] COPY requirements.txt /tmp/requirements.txt
#11 CACHED

#12 [5/7] RUN pip install --no-cache-dir -r /tmp/requirements.txt
#12 CACHED

#13 [7/7] COPY src /app
#13 CACHED

#14 exporting to image
#14 exporting layers done
#14 exporting manifest sha256:f48a1a6131418054742763f69f1dcedfb6b05778811496744b59849c450f17d9 done
#14 exporting config sha256:79336e750e7248454e1f787d55205fe80388327df953b518c98dc0af021c03b4 done
#14 exporting attestation manifest sha256:648132a6ab8fd8cd12ba9c028b945744377f898e52f2985068c2da303d5e1f7a 0.1s done
#14 exporting manifest list sha256:f27c463baa716d47f1a67d624e7231ba7f71c6a234341930e00eb7b533d361ef
#14 exporting manifest list sha256:f27c463baa716d47f1a67d624e7231ba7f71c6a234341930e00eb7b533d361ef 0.0s done
#14 naming to https://docker.io/library/runboat-runboat:latest done
#14 unpacking to https://docker.io/library/runboat-runboat:latest 0.0s done
#14 DONE 0.2s

#15 resolving provenance for metadata file
#15 DONE 0.0s
[+] Running 4/4
 ✔ runboat-runboat               Built                                                                                                                                                                                                0.0s
 ✔ Network runboat_default       Created                                                                                                                                                                                              0.1s
 ✔ Container runboat-postgres    Started                                                                                                                                                                                              0.6s
 ✔ Container runboat-controller  Started
If you have setup a GitHub webhook and you push a commit to the repository a new instance of Odoo is automatically created. If you are using a local domain, you need to make sure that Runboat is aware of the latest commit. So instead of only pushing the latest commit to the repository you also have to manually trigger a build
# Trigger a build for the main branch
curl -u admin:secret -X POST "http://localhost:8000/api/v1/builds/trigger/branch?repo=jortdevreeze/extending-modules&branch=main"
# Or trigger for a different branch
curl -u admin:secret -X POST "http://localhost:8000/api/v1/builds/trigger/branch?repo=jortdevreeze/extending-modules&branch=develop"
If you open http://localhost:8000/webui/builds.html?jortdevreeze/extending-modules you will be able to see your new build together with all previous builds on.
Note
If it's the first time you are building an OCI-CI image you should be aware that it can take a while for the build to be finished (mine took approximately 30 minutes). This is because it has to pull and build a large image from scratch (see also the Troubleshooting section).
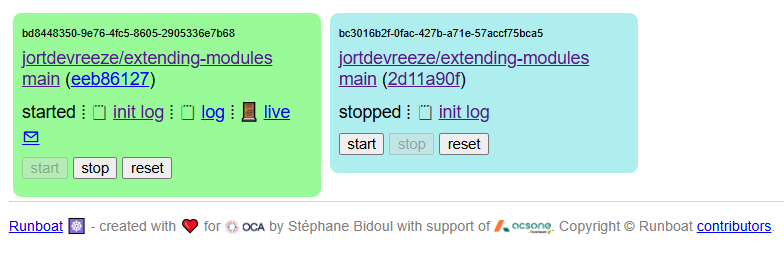
If everything is configured correctly, you will be able to open Odoo by clicking on the live button.
You are now able to login to one of the created databases for this commit using admin and admin as a username and password, respectively.
Once you’re in, you’re working on a clean, isolated Odoo for that exact commit. This is perfect for validating features, loading demo data, and if you are not on localhost perfect for sharing a stable URL with teammates or clients.
Troubleshooting
Although Kubernetes is an extremely powerful tool, it can also be hard to manage. Very often things seem to go wrong. If you want to see what is happening during the initialization you can query all the events.
kubectl get events -n runboat-builds --sort-by='.lastTimestamp'
This will output something like this
AST SEEN   TYPE      REASON                  OBJECT                                                             MESSAGE
...
23s         Normal    Scheduled               pod/bc3016b2f-0fac-427b-a71e-57accf75bca5-initialize-njnw2         Successfully assigned runboat-builds/bc3016b2f-0fac-427b-a71e-57accf75bca5-initialize-njnw2 to docker-desktop
23s         Normal    SuccessfulCreate        job/bc3016b2f-0fac-427b-a71e-57accf75bca5-initialize               Created pod: bc3016b2f-0fac-427b-a71e-57accf75bca5-initialize-njnw2
21s         Normal    Pulling                 pod/bc3016b2f-0fac-427b-a71e-57accf75bca5-initialize-njnw2         Pulling image "https://ghcr.io/oca/oca-ci/py3.10-odoo18.0:latest%22
19s         Normal    Pulled                  pod/bc3016b2f-0fac-427b-a71e-57accf75bca5-initialize-njnw2         Successfully pulled image "https://ghcr.io/oca/oca-ci/py3.10-odoo18.0:latest%22 in 1.875s (1.875s including waiting). Image size: 849857163 bytes.
19s         Normal    Created                 pod/bc3016b2f-0fac-427b-a71e-57accf75bca5-initialize-njnw2         Created container: initialize
19s         Normal    Started                 pod/bc3016b2f-0fac-427b-a71e-57accf75bca5-initialize-njnw2         Started container initialize
12s         Warning   BackoffLimitExceeded    job/bc3016b2f-0fac-427b-a71e-57accf75bca5-initialize               Job has reached the specified backoff limit
In this particular example the build failed as indicated by the warning. If you want to know why this build failed you can inspect the logs of the 'pod' which was created as bc3016b2f-0fac-427b-a71e-57accf75bca5-initialize-njnw2.
To get the details of a pod you can run the following
kubectl logs -n runboat-builds pod/bc3016b2f-0fac-427b-a71e-57accf75bca5-initialize-njnw2
This can output something like this.
kubectl logs -n runboat-builds pod/bc3016b2f-0fac-427b-a71e-57accf75bca5-initialize-njnw2
/runboat/https://runboat-initialize.sh/ line 2: $'\r': command not found
/runboat/https://runboat-initialize.sh/ line 6: $'\r': command not found
...
/runboat/https://runboat-initialize.sh/ line 34: --stop-after-init: command not found
Here you can see that there was an issue with the 'end-of-line-sequence'. I had to convert all bash files from CRLF to LF.
Active Deadline
Depending on your hardware and Docker Desktop setup, pulling the OCA CI images can take a long time. To make sure that you won't run into timing issues, you can either pull them manually.
docker pull https://ghcr.io/oca/oca-ci/py3.10-odoo18.0:latestOr you increase the activeDeadlineSeconds from 1200 to 3600 in the initialize.yaml. This will make sure the building process is increased from 20 minutes to 1 hour.
404 Not Found
I was not able to access any of the builds and Ingress kept returning 404 errors. After trying to figure out what could be the cause of this, I noticed that when running kubectl describe ingress -n runboat-builds that the Ingress Class was missing.
Name:             bd8448350-9e76-4fc5-8605-2905336e7b68-odoo
Labels:           runboat/build=bd8448350-9e76-4fc5-8605-2905336e7b68
Namespace:        runboat
Address:
Ingress Class:    <none>
Default backend:  <default>
Rules:
  Host                                                                 Path  Backends
  ----                                                                 ----  --------
  https://jortdevreeze-extending-modules-main-eeb86127d6cd.127.0.0.1.sslip.io/
                                                                       /   bd8448350-9e76-4fc5-8605-2905336e7b68-odoo:8069 ()
Annotations:                                                           runboat/git-commit: eeb86127d6cdc2e6e9aa8669943df0386f4906a8
                                                                       runboat/pr:
                                                                       runboat/repo: jortdevreeze/extending-modules
                                                                       runboat/target-branch: main
Events:                                                                <none>
I was able to fix this by adding the IngressClassName to the ingress_odoo.yaml. After rebuilding the Runboat controller and pushing a new commit, the new build now had a IngressClass specified.
apiVersion: https://networking.k8s.io/v1
kind: Ingress
metadata:
  name: odoo
spec:
  ingressClassName: nginx
  rules:
    - http:
        paths:
          - path: /
            pathType: Prefix
            backend:
              service:
                name: odoo
                port:
                  number: 8069
To find out what class name you should use you have to run kubectl get ingressclass, which should output something like this:
NAME CONTROLLER PARAMETERS AGE
nginx https://k8s.io/ingress-nginx <none> 7dConclusion
That's it! With Runboat in place, you’ve turned branches into shareable, disposable Odoo environments. From here, consider building your own images with all the dependencies you need (e.g., enterprise), automating builds in CI, and refining your RUNBOAT_REPOS rules so every push spins up exactly the environment you need.